
Hi everyone!
In this post, I will show how to run the new Spring Boot starter for the Spatial features in Oracle AI Database 26ai by using the sample application and connecting it to a simple web application front end.
The starter makes it easier to build Spring Boot applications that work with Oracle Spatial data and expose that data through familiar REST APIs. For this example, I am using Oracle AI Database 26ai Free, the Spatial sample application from the Spring Cloud Oracle repository, and a small React front end that displays landmark data on a map.
The app will do three things:
- load landmarks inside an initial San Francisco polygon
- find the nearest landmarks to a point you click on the map
- search the landmarks inside the current visible map area
The Spring Boot starter for the Spatial features in Oracle AI Database 26ai is a v1 release, and I want to say that clearly up front. If you build spatial applications with Spring Boot and Oracle Database, I would really love feedback on what works well, what feels awkward, and what you would want to see next.
A few important things to note before we get into the code:
- the work is merged into
main - the new starter artifacts may still be ahead of the next Maven Central release
- for this walkthrough, I am running the sample application from a source checkout of the spring-cloud-oracle repository
That last point matters because I want to give you steps you can run today, not steps that depend on a release that may not have shipped yet.
Before You Begin
For this walkthrough, you will need:
- Java 21 or newer
- Maven
- Node.js and npm
- Docker
- a local checkout of the spring-cloud-oracle repository
- a local checkout of this frontend companion repository
You will also need Oracle AI Database 26ai Free running locally.
If you already have Oracle AI Database 26ai Free running and you already have a user/schema you want to use for testing, you can adapt the setup below. I am going to show the exact steps that worked for me from a clean local environment.
Start Oracle AI Database 26ai Free
Before you run the container, sign in to Oracle Container Registry and accept the Oracle terms for the Oracle AI Database 26ai Free image. If you skip that step, the image pull may fail with an authentication or authorization error.
Then start Oracle AI Database 26ai Free in a container:
 docker run -d \
   --name oracle-free \
   -p 1521:1521 \
   -e ORACLE_PWD=Welcome1 \
   container-registry.oracle.com/database/free:latest
The first startup will take a few minutes. You can check the logs to see when startup is complete:
docker logs -f oracle-free
Wait until you see the message DATABASE IS READY TO USE before continuing.
Create the Sample User
For local testing, the sample worked most reliably when I created a dedicated user for it and granted the permissions needed for the spatial objects and index.
Connect as the system user and run:
 create user spatialsample identified by spatialsample;
 grant create session to spatialsample;
 grant create table to spatialsample;
 grant create view to spatialsample;
 grant create sequence to spatialsample;
 grant create procedure to spatialsample;
 grant unlimited tablespace to spatialsample;
 grant create indextype to spatialsample;
 grant create operator to spatialsample;
 grant execute on mdsys.sdo_geometry to spatialsample;
 grant execute on mdsys.sdo_util to spatialsample;
 grant execute on mdsys.sdo_geom to spatialsample;
 grant execute on mdsys.sdo_cs to spatialsample;
 grant execute on mdsys.spatial_index_v2 to spatialsample;
I am calling this out explicitly because this is one of the places where a setup detail can quietly derail the rest of the sample. Creating the user and grants up front made the rest of the walkthrough much more predictable.
The explicit grant execute on mdsys.spatial_index_v2 may look a little unusual at first glance, but it is there for a reason. Oracle’s Spatial index documentation calls out the need for EXECUTE privilege on the index type and its implementation type when creating a spatial index.
Create the Schema and Seed Data
Next, connect as the new spatialsample user and set up the schema and initial sample data:
create table if not exists landmarks ( id number primary key, name varchar2(200) not null, category varchar2(100) not null, geometry mdsys.sdo_geometry not null );delete from user_sdo_geom_metadatawhere table_name = 'LANDMARKS' and column_name = 'GEOMETRY';insert into user_sdo_geom_metadata (table_name, column_name, diminfo, srid)values ( 'LANDMARKS', 'GEOMETRY', mdsys.sdo_dim_array( mdsys.sdo_dim_element('LONG', -180, 180, 0.005), mdsys.sdo_dim_element('LAT', -90, 90, 0.005) ), 4326);create index if not exists landmarks_spatial_idxon landmarks (geometry)indextype is mdsys.spatial_index_v2;delete from landmarks;insert into landmarks (id, name, category, geometry)values (1, 'Ferry Building', 'MARKET', sdo_util.from_geojson('{"type":"Point","coordinates":[-122.3933,37.7955]}', null, 4326)), (2, 'Union Square', 'PLAZA', sdo_util.from_geojson('{"type":"Point","coordinates":[-122.4074,37.7879]}', null, 4326)), (3, 'Golden Gate Park', 'PARK', sdo_util.from_geojson('{"type":"Polygon","coordinates":[[[-122.511,37.771],[-122.454,37.771],[-122.454,37.768],[-122.511,37.768],[-122.511,37.771]]]}', null, 4326)), (4, 'Oracle Park', 'STADIUM', sdo_util.from_geojson('{"type":"Point","coordinates":[-122.3893,37.7786]}', null, 4326)), (5, 'Salesforce Tower', 'SKYSCRAPER', sdo_util.from_geojson('{"type":"Point","coordinates":[-122.3969,37.7897]}', null, 4326));commit;
At this point, I have:
- a
landmarkstable - spatial metadata in
USER_SDO_GEOM_METADATA - a spatial index
- seeded landmarks to query
This is one of those places where I think being explicit helps. It is very easy to gloss over schema setup in a sample, but for Oracle Spatial this part is important:
- the table exists
- the geometry metadata exists
- the spatial index exists
- the sample data is already in place
Without those pieces, the rest of the walkthrough is much harder to follow.
I also like this version of the setup script because it is easier to rerun while you are testing locally. It clears the metadata entry and seed data before recreating the parts of the sample that need to be there.
Run the Official Sample Application
The backend for this walkthrough is the official sample application from the Spring Cloud Oracle repository.
The command that worked reliably for me was:
cd ~/spring-cloud-oracle/database/starters/oracle-spring-boot-starter-samples/oracle-spring-boot-sample-spatialmvn spring-boot:run \ -Dspring-boot.run.arguments="--spring.datasource.url=jdbc:oracle:thin:@//localhost:1521/FREEPDB1 --spring.datasource.username=spatialsample --spring.datasource.password=spatialsample"
Note that I split that string for readability, but you need to put it all on one line!
There are two details here that are worth calling out:
- I ran the command from the sample module directory
- passing the datasource properties through
spring-boot.run.argumentswas the most reliable local approach
That is worth preserving exactly. I tried a couple of other ways to pass the datasource values, and this was the one that consistently worked for me.
If that starts cleanly, the sample backend should now be listening on http://localhost:9002.
What the Sample Already Gives Us
Before I write any frontend code, it is worth looking at what the sample already gives us.
The REST API is small and very easy to explain:
POST /landmarksGET /landmarks/{id}GET /landmarks/nearPOST /landmarks/within
That is a useful shape for a tutorial because it is already enough to demonstrate:
- GeoJSON in and GeoJSON out
- nearest-neighbor style point searches
- polygon-based area searches
Add Local CORS for the Frontend
When I first tried to connect the frontend to the sample application, I hit a CORS problem. For local development, the fix was to add @CrossOrigin to LandmarkController.java in the sample application.
Add this import:
import org.springframework.web.bind.annotation.CrossOrigin;Then annotate the controller:
 @CrossOrigin(origins = "http://localhost:5173")
 @RestController
 public class LandmarkController {
 // ...
 }
This is just for local development. I would not copy this unchanged into a production application.
Also, if you skip this and go straight to the frontend, the browser error is not especially helpful. You will usually just see a generic “failed to fetch” style error when the request to /landmarks/within gets blocked.
Smoke-Test the REST API
Before building the frontend, I like to make sure the API is behaving the way I expect.
Let’s start with a few direct calls to the sample backend.
A simple lookup by id:
curl http://localhost:9002/landmarks/1
A nearest-neighbor style request using a compact GeoJSON point in the query string:
 curl --get "http://localhost:9002/landmarks/near" \
 --data-urlencode 'geometry={"type":"Point","coordinates":[-122.3933,37.7955]}' \
 --data-urlencode 'distance=2000' \
 --data-urlencode 'limit=3'
A polygon search:
 curl -X POST http://localhost:9002/landmarks/within \
 -H "Content-Type: application/json" \
 -d '{
 "geometry":"{\"type\":\"Polygon\",\"coordinates\":[[[-122.515,37.75],[-122.35,37.75],[-122.35,37.808],[-122.515,37.808],[-122.515,37.75]]]}",
 "mask":"ANYINTERACT"
 }'
At this point, it is useful to verify that the backend is returning the kind of data we expect before moving on to the browser. The following example shows the API working from the command line.
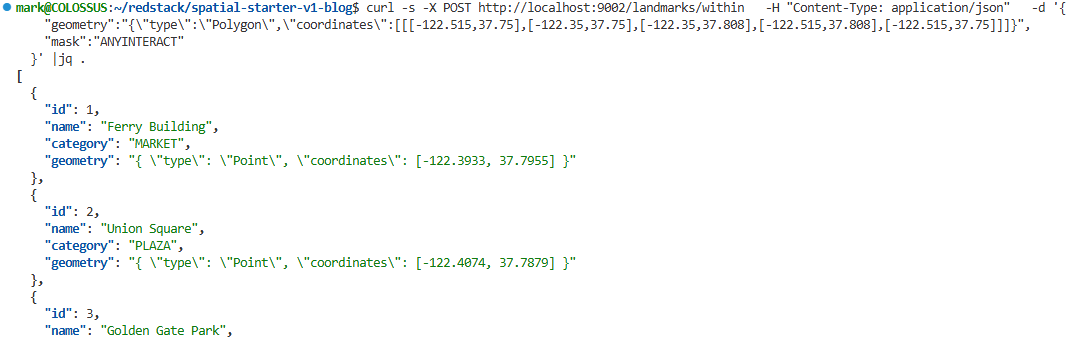
If these calls work, the rest of the article gets a lot simpler. At that point, we know the database is up, the sample app is talking to it, and the spatial endpoints are behaving before the browser gets involved.
The Frontend Project
For the UI, I used a separate React application built with Vite, TypeScript, and React Leaflet.
Here is the full layout of the web directory before I walk through the main pieces:
 web/
   src/
     App.tsx
     components/
       MapView.tsx
     lib/
       api.ts
       geo.ts
I kept this frontend separate from the sample app because it makes the browser-side behavior easier to explain, and it is a very common setup that most people will recognize immediately.
I also like this split for demo applications because it keeps the browser code and the backend code easy to reason about independently.
Start the Frontend
In this frontend project, start the development server like this:
 cd ~/spatial-starter-v1-blog/web
 VITE_API_BASE_URL=http://localhost:9002 npm run dev
By default, Vite runs on http://localhost:5173, which is why that is the origin I allowed in the local CORS annotation above.
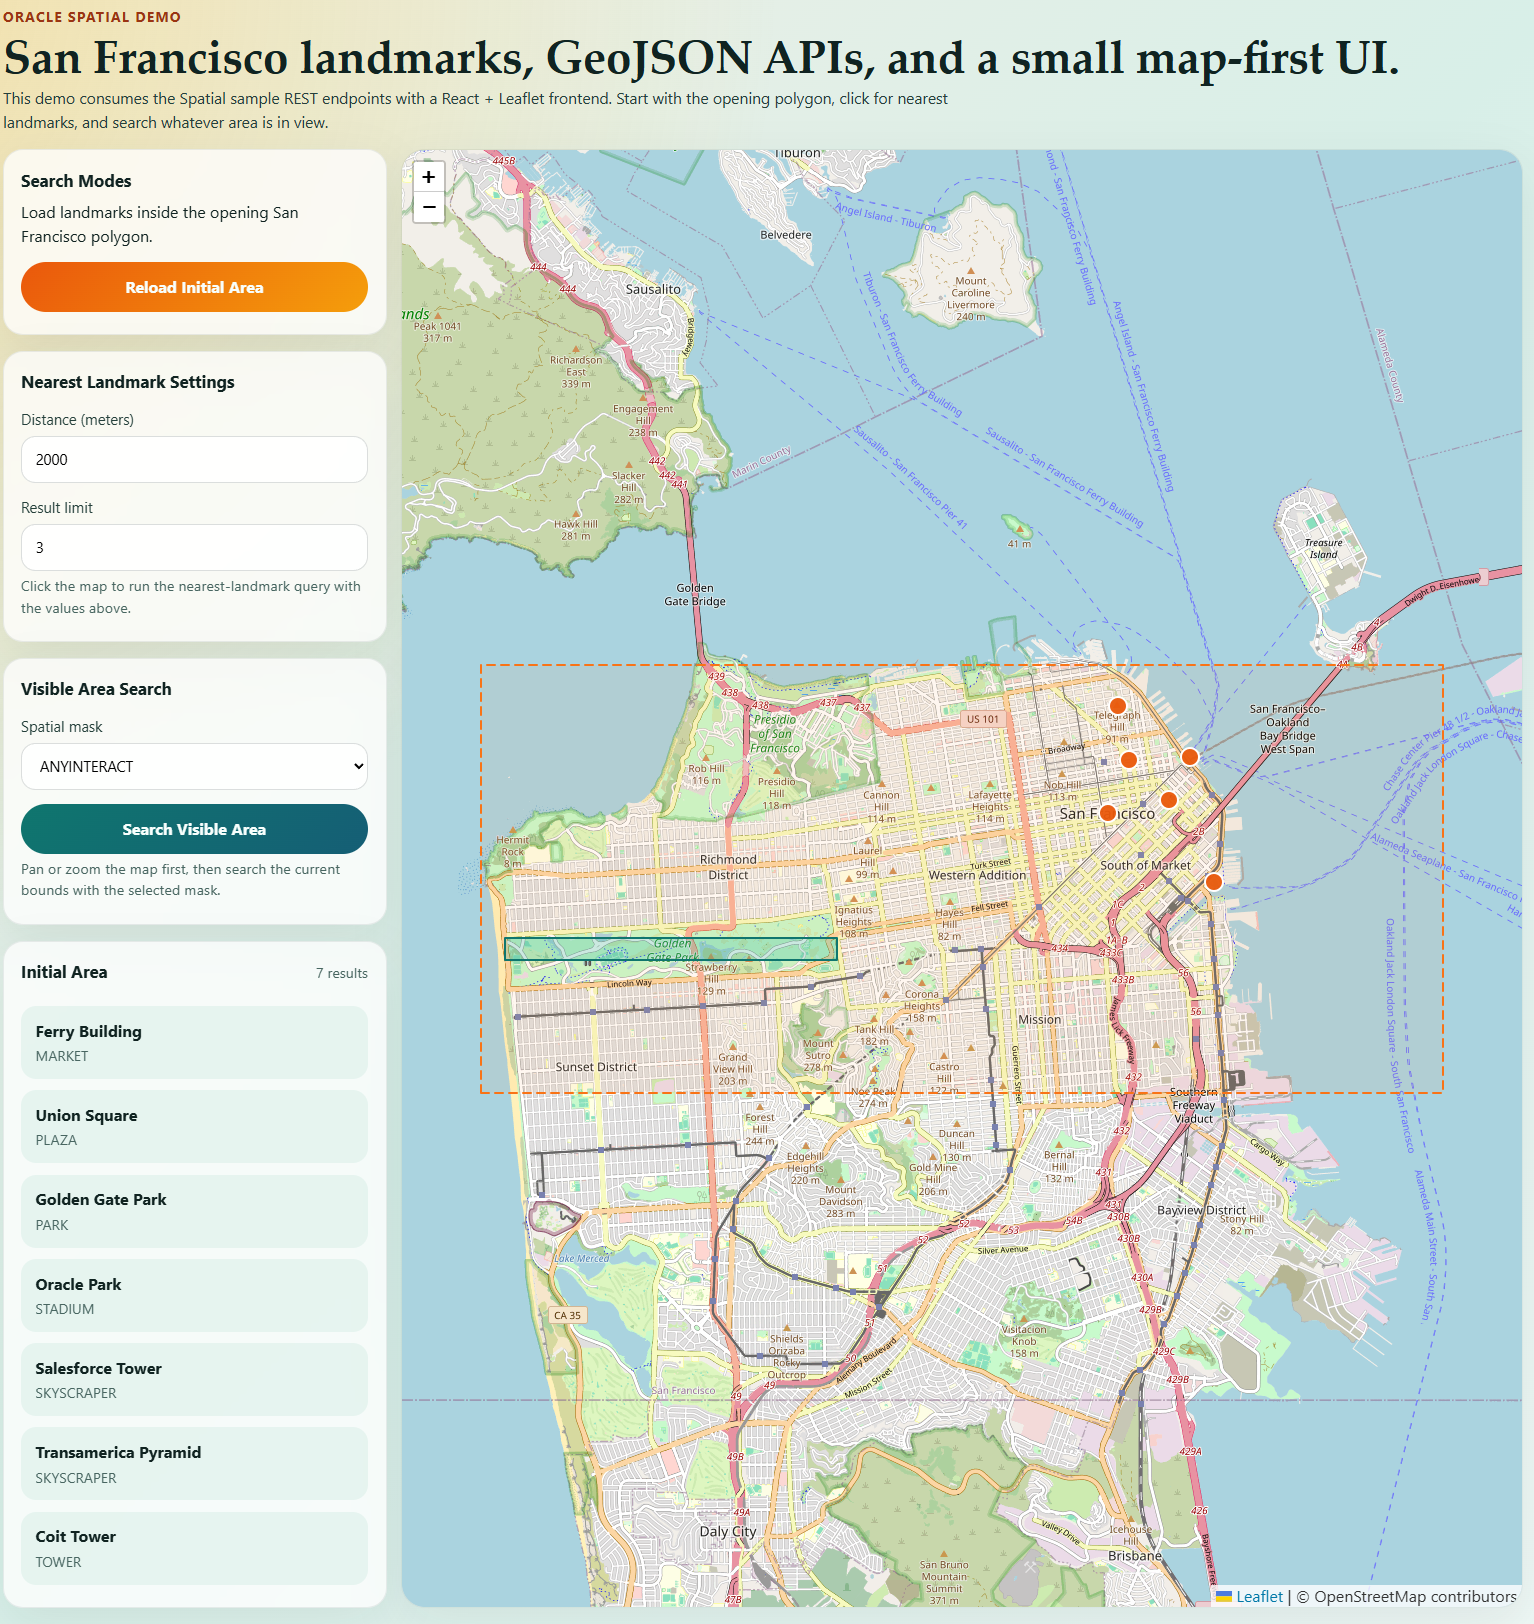
The Initial Map Load
For the initial screen, I did not want a generic “list all landmarks” endpoint. Since this is a spatial application, I wanted the initial load to already be spatially scoped.
So instead, I defined an opening polygon for a useful part of San Francisco:
- north: Fisherman’s Wharf
- east: Oracle Park
- south: Mission
- west: the western edge of Golden Gate Park
In the frontend, that polygon is just a small GeoJSON object:
const INITIAL_WEST = -122.515;const INITIAL_EAST = -122.35;const INITIAL_SOUTH = 37.75;const INITIAL_NORTH = 37.808;export const initialSearchPolygon = { type: "Feature", properties: { label: "Initial San Francisco search area" }, geometry: { type: "Polygon", coordinates: [[ [INITIAL_WEST, INITIAL_SOUTH], [INITIAL_EAST, INITIAL_SOUTH], [INITIAL_EAST, INITIAL_NORTH], [INITIAL_WEST, INITIAL_NORTH], [INITIAL_WEST, INITIAL_SOUTH] ]] }};
Then I post that polygon to /landmarks/within with the ANYINTERACT mask.
That gives the initial screen a much more natural map behavior. Instead of “show me everything,” the app starts with “show me the landmarks in this area.”
One small helper worth showing here is geometryToString. The sample accepts the geometry field as a JSON string, not as a nested object, so the frontend needs to serialize the GeoJSON before sending it.
export function geometryToString(feature: Feature): string { return JSON.stringify(feature.geometry);}
With that helper in place, the API call stays pretty small:
export async function fetchLandmarksWithin(feature: Feature<Geometry>, mask: string): Promise<Landmark[]> { const response = await fetch(`${API_BASE_URL}/landmarks/within`, { method: "POST", headers: { "Content-Type": "application/json" }, body: JSON.stringify({ geometry: geometryToString(feature), mask }) }); if (!response.ok) { throw new Error(await response.text()); } return response.json() as Promise<Landmark[]>;}
And the initial load in the app looks like this:
useEffect(() => { void loadInitialArea();}, []);async function loadInitialArea() { setLoading(true); setError(null); setActiveFeature(initialSearchPolygon as Feature<Geometry>); setNearestSearchRadius(null); try { const landmarks = await fetchLandmarksWithin(initialSearchPolygon as Feature<Geometry>, "ANYINTERACT"); setSearchResults(makeResultSet("initial-area", landmarks)); mapRef.current?.fitBounds([ [37.75, -122.515], [37.808, -122.35] ]); } finally { setLoading(false); }}
Once the initial polygon query is wired up, the application starts with a focused view of San Francisco and only the landmarks that fall inside that opening search area.
Rendering Points and Polygons
One of the nice things about the sample is that the API boundary stays GeoJSON-first. That means the frontend does not need a special Oracle representation. It can just parse the returned GeoJSON and render it.
I render polygon landmarks with GeoJSON, and point landmarks with CircleMarker.
{areaFeatures.map((landmark) => ( <GeoJSON key={landmark.id} data={parseLandmarkGeometry(landmark.geometry) as Polygon} style={() => ({ color: "#0f766e", weight: 2, fillColor: "#14b8a6", fillOpacity: 0.22 })} />))}{pointFeatures.map((landmark) => { const geometry = parseLandmarkGeometry(landmark.geometry) as Point; const [longitude, latitude] = geometry.coordinates; return ( <CircleMarker key={landmark.id} center={[latitude, longitude]} radius={9} pathOptions={{ color: "#ffffff", weight: 2, fillColor: "#ea580c", fillOpacity: 0.95 }} /> );})}
That is the core value proposition here. The backend gets to use Oracle Spatial, and the browser gets to stay in familiar GeoJSON territory.
For a web application, that is exactly the split I want.
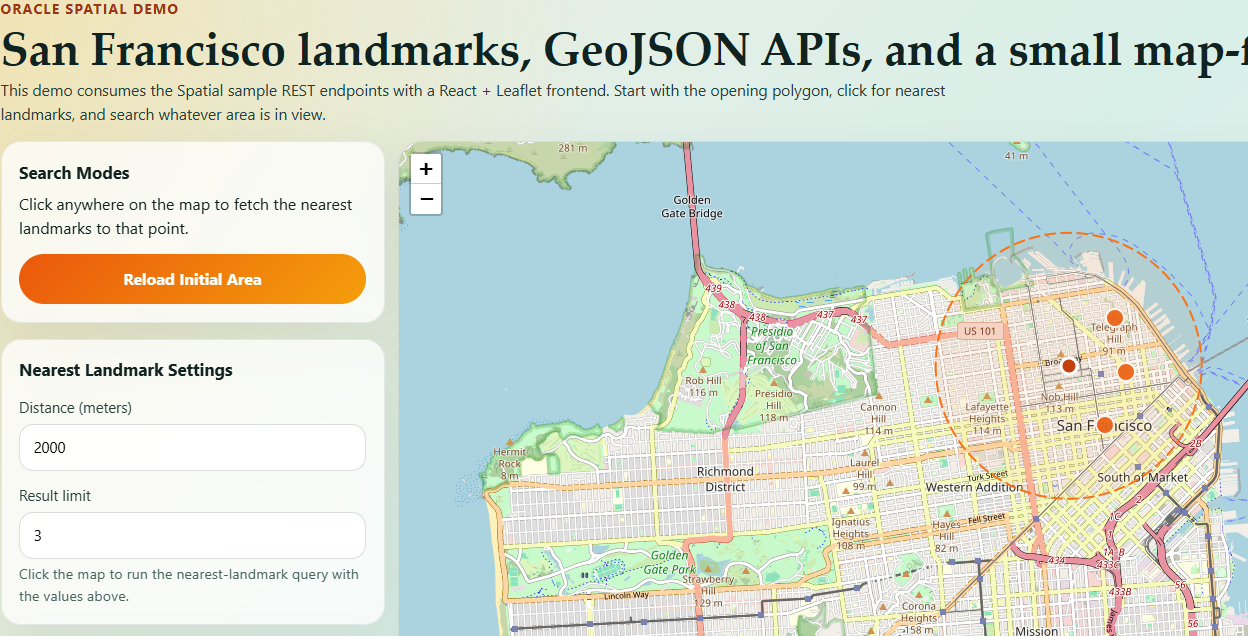
Nearest Landmarks from a Clicked Point
The next feature is the one I wanted most for the demo: click on the map, send a point to the backend, and get the nearest landmarks back.
On click, I convert the map location into a GeoJSON point:
export function pointFeatureFromCoordinates(longitude: number, latitude: number): Feature<Geometry> { return { type: "Feature", properties: { label: "Selected point" }, geometry: { type: "Point", coordinates: [longitude, latitude] } };}
Then I send that point to /landmarks/near with distance and limit values:
export async function fetchNearbyLandmarks(point: Feature<Geometry>, distance: number, limit: number): Promise<Landmark[]> { const params = new URLSearchParams({ geometry: geometryToString(point), distance: String(distance), limit: String(limit) }); const response = await fetch(`${API_BASE_URL}/landmarks/near?${params.toString()}`); if (!response.ok) { throw new Error(await response.text()); } return response.json() as Promise<Landmark[]>;}
One small UX detail I liked here was keeping the clicked point visible and drawing a circle for the search radius.
{nearestSearchRadius ? ( <Circle center={[activePoint.geometry.coordinates[1], activePoint.geometry.coordinates[0]]} radius={nearestSearchRadius} pathOptions={{ color: "#f97316", weight: 2, fillColor: "#fdba74", fillOpacity: 0.12, dashArray: "10 6" }} />) : null}<CircleMarker center={[activePoint.geometry.coordinates[1], activePoint.geometry.coordinates[0]]} radius={8} pathOptions={{ color: "#ffffff", weight: 3, fillColor: "#c2410c", fillOpacity: 1 }}/>
That makes the search feel much more obvious when you use the map.
It is a small detail, but it makes the demo much easier to understand visually. You can immediately see both the point you picked and the radius you asked the backend to search within.
The screenshot below shows that interaction in context, with the selected point on the map and the search radius drawn around it.
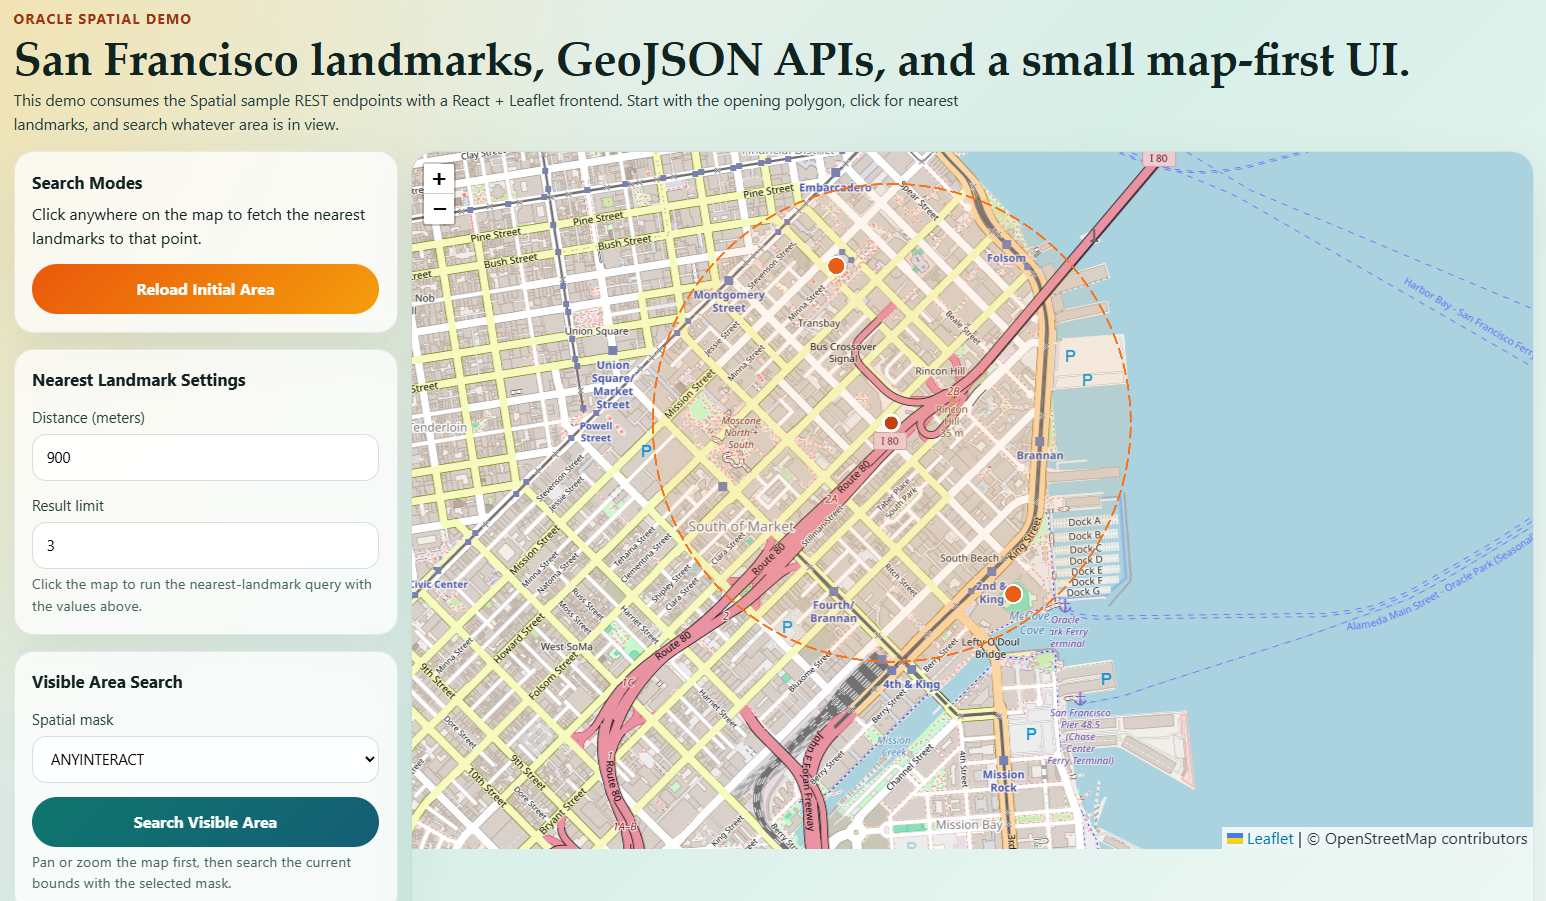
Search the Visible Area
The other interaction I wanted was the ability to search the current map area.
For that, I turn the map bounds into a polygon and post it to /landmarks/within:
export function boundsToPolygon(bounds: LatLngBounds): Feature<Polygon> { const west = bounds.getWest(); const east = bounds.getEast(); const south = bounds.getSouth(); const north = bounds.getNorth(); return { type: "Feature", properties: { label: "Visible map area" }, geometry: { type: "Polygon", coordinates: [[ [west, south], [east, south], [east, north], [west, north], [west, south] ]] } };}
Then the app sends that polygon with the currently selected mask:
async function handleVisibleAreaSearch() { if (!visibleBounds) { return; } const polygon = boundsToPolygon(visibleBounds) as Feature<Geometry>; setActiveFeature(polygon); setNearestSearchRadius(null); const landmarks = await fetchLandmarksWithin(polygon, mask); setSearchResults(makeResultSet("area-search", landmarks));}
I kept the mask choices simple for this version:
ANYINTERACTINSIDE
ANYINTERACT returns any landmark that touches or overlaps the search polygon, which is useful when a geometry sits on the edge of the visible area. INSIDE returns only landmarks whose geometry falls entirely within the polygon.
After panning the map and running the visible-area query, the UI updates to reflect the current viewport instead of the original startup polygon.
Why the GeoJSON Boundary Matters
There are a few reasons I like this sample as a starting point.
First, the sample stays GeoJSON-first at the API boundary. That is exactly what I want for browser-facing map work.
Second, the backend makes the spatial queries feel very normal from a Spring developer perspective. You are still building a simple REST application, not learning a whole new framework just to use Oracle Spatial.
Third, the v1 scope feels very reasonable. It gives me enough to build real point and polygon workflows, and it gives me something concrete to build on without trying to solve every spatial use case at once.
That said, this is also why I would really like feedback from people who actively use Oracle Spatial and Spring Boot. The best next steps will probably come from the people doing this work for real.
Wrapping Up
For this example, I used the new Oracle Spatial Spring Boot sample as the backend, then layered a small React + Leaflet application on top of it to:
- load a meaningful initial area
- search for nearby landmarks from a clicked point
- query landmarks inside the current visible map area
The part I like most is that nothing about the frontend had to become Oracle-specific. The browser stayed in GeoJSON and map primitives, which is exactly where I want it.
For a Spring developer, that is one of the most useful parts of this v1 starter. It makes it much easier to work with spatial data in a normal Spring Boot application without having to invent the basic plumbing first.
If you are using Oracle Spatial with Spring Boot, I would genuinely love feedback on what works well, what feels awkward, and what you would want to see next.
Links
- Spring Cloud Oracle repository
- Spatial sample module: database/starters/oracle-spring-boot-starter-samples/oracle-spring-boot-sample-spatial
- Frontend companion repository for this demo


You must be logged in to post a comment.