What you need to use ADF

This blog contains many articles about Oracle Application Development Framework (ADF).  In order to develop and run applications using ADF, you will need to install Oracle JDeveloper, which you can download from the Oracle Technology Network (here).

Each post will contain a note to let you know what version of JDeveloper was used for that post.

If you use multiple operating systems, and a mixture of 32-bit and 64-bit (like me) then you should grab the “base install” version, which is a generic JAR file that can be installed on any platform (provided you have a supported JDK).  I have installed this version on 32-bit Windows and Linux, and 64-bit Windows, Linux, Mac OS X and Solaris.  If you are going to use Mac OS X, you might want to check the hints here.

Posted in Uncategorized | Tagged , | Leave a comment

How to make Chrome on OS X trust a self-signed certificate

When setting up Subversion recently to use with my various JDeveloper and NetBeans installations here, there and everywhere, I wanted to browse my repositories from Chrome (my main day to day browser) on Mac OS X (my main day to day OS).  But, my Subversion installation is using HTTPS with a self-signed certificate, so I had to tell Chrome how to understand it.

The process is as follows:

  • Open the offending site in Chrome
  • Click on little bang icon at the right hand end of the address bar
  • Hold down the Option key and drag the certificate from the popup dialog to the desktop
  • Rename it with a .cer extension
  • In the Chrome menu, navigate to Preferences, Under the Hood, Security, Manage Certificates
  • Click on the plus “+” icon to add a certificate
  • Point to the .cer file on the desktop
  • Select the option to trust the certificate

That’s it, all done!

Posted in Uncategorized | Tagged , , , | Leave a comment

Installing Oracle XE database on 64-bit Ubuntu

After many years, I took a fresh look at Ubuntu, and I found it to be great!  So naturally, I wanted to install Oracle XE database to play around with.  But this comes as a 32-bit rpm.  What to do?

Fortunately, I found a great post over at littlebrain.org that describes the process and pitfalls in some details.  I wont repeat the whole post here, just the key steps, but I strongly encourage you to head on over and take a look at Aldiantoro’s post!

sudo apt-get install libc6-i386
wget -c http://oss.oracle.com/debian/dists/unstable/main/binary-i386/libaio_0.3.104-1_i386.deb http://oss.oracle.com/debian/dists/unstable/non-free/binary-i386/oracle-xe-universal_10.2.0.1-1.1_i386.deb
sudo dpkg -i --force-architecture libaio_0.3.104-1_i386.deb
sudo dpkg -i --force-architecture oracle-xe-universal_10.2.0.1-1.1_i386.deb
sudo /etc/init.d/oracle-xe configure

Then edit your ~/.bashrc

ORACLE_HOME=/usr/lib/oracle/xe/app/oracle/product/10.2.0/server
PATH=$PATH:$ORACLE_HOME/bin
export ORACLE_HOME
export ORACLE_SID=XE
export PATH
Posted in Uncategorized | Tagged , | 3 Comments

Exposing PeopleSoft portlets through WebCenter with WS-Security

Note: This post is an updated and extended version of this older post.

This post was produced jointly with Shawn Xin and Wellen Lau along with help and support from several other people.

1       Introduction

Often customers wish to expose a small part of PeopleSoft functionality to end users, without the need for those users to learn how to use the whole PeopleSoft user interface.  For example, there may be a desire to expose the absence request function in Employee Self Service through a staff intranet.

PeopleTools 8.48 and later releases allow you to expose PeopleSoft applications as “portlets” using the Web Service Remote Portlet (WSRP) standard, which is a convenient, code-free, way of integrating with portal platforms like Oracle WebCenter.

2       Requirements

The examples in this document were prepared using PeopleSoft HCM 9.1 with PeopleTools 8.50 and WebCenter 11.1.1.3.

3       Establishing the basic integration

In this section we will establish the basic integration between WebCenter and PeopleSoft.  Later, we will look at additional steps that can be carried out to add automatic sign on to PeopleSoft.

3.1     Exposing PeopleSoft Functionality using WSRP

The first step is to log on to PeopleSoft and tell it to expose some functionality as a WSRP portlet. Here we log on to PeopleSoft using the PS user:

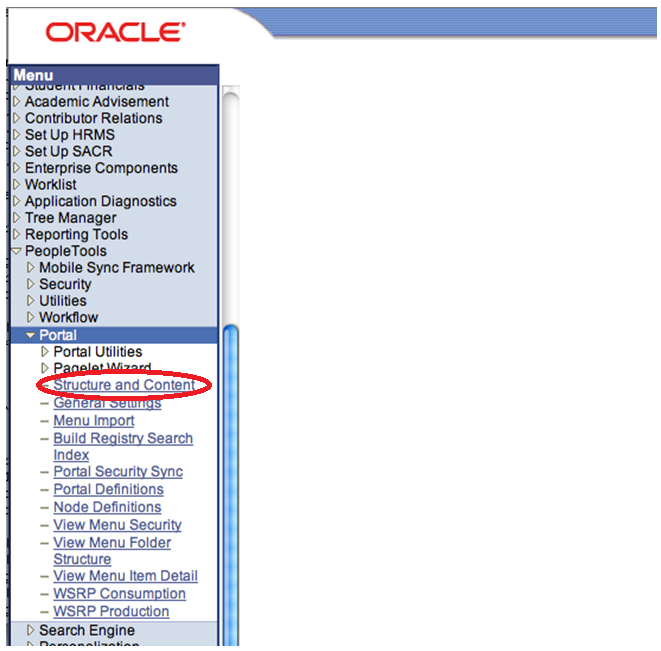
Now, navigate to the PeopleTools menu, then Portal, then Structure and Content.

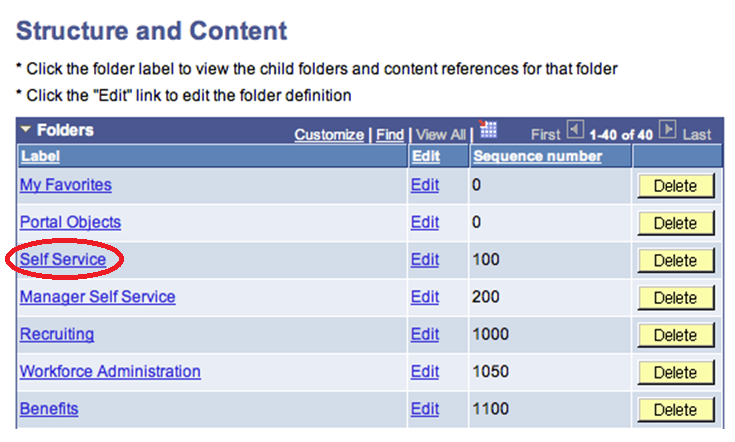
Now, we select the area of functionality we want to expose.  In this example, I am going to choose Self Service.

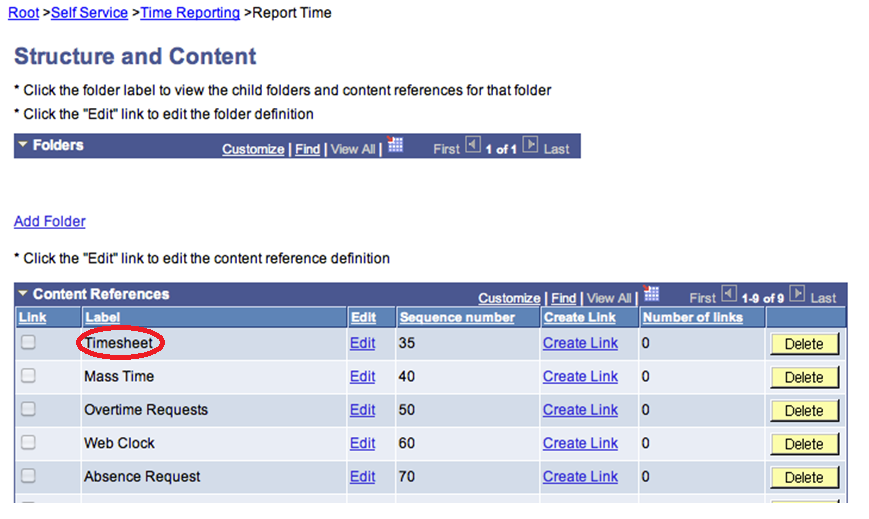
We navigate down to the page we want, in this example, going into Time Reporting.

And then Report Time.

Now we click on the Edit link to the right of Timesheet, Absence Request, or whichever function you wish to expose.

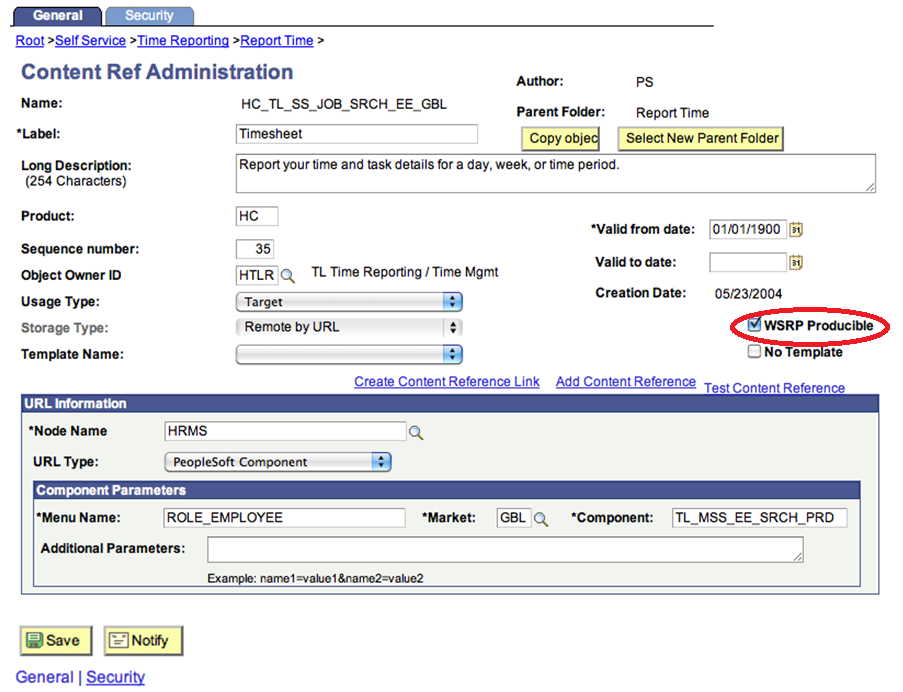
In the administration page that is displayed, all we need to do is check the WSRP Producible checkbox, as shown, and then click on the Save button.

We can repeat these steps for any other functions that we want to expose as portlets.  In my example, I have also exposed Personal Information as you can see in the image below.  You can get to this page by navigating to the WSRP Production menu item underneath PeopleTools and then Portal.  When you have exposed all of the functions you want to, expand the Web Service Endpoint URL box as shown, and take a note of the URL listed there, you will need this later.

3.2     Modifying the behavior to work well in an external portal

Since we are going to be using this function from an external portal, it is important that it respects the portal framework, and does not try to “take over” the whole screen.

To do this, we go to PeopleSoft Application Designer and open the component object to the Request Details page that gets displayed in PeopleSoft.  In the Component Properties section, we need to check the box labeled WSRP Compliant.

3.3     Registering the PeopleSoft WSRP Provider in WebCenter

That’s all we need to do in PeopleSoft, now we go to the Enterprise Manager to register our portlet(s).  This is accessed at http://yourserver:7001/em in a default install.  Login using an administrative user (e.g. weblogic) and navigate to the webcenter item under the Farm_your_domain > WebCenter > WebCenter Spaces menu.  Then open the WebCenter drop down menu (as shown) and select Register Producer from the menu.

Here we just need to give our producer a name, I used PeopleSoft, and provide the URL we copied down earlier.  Then add ?wsdl to the end of the URL, as shown in the diagram.  This tells Enterprise Manager to read the definition of the portlet, not the actual portlet itself.  Enterprise Manager needs this information to register the portlet(s).

Click on OK to save that, and now we are ready to go and use our portlet!

3.4     Adding the PeopleSoft portlet to a WebCenter page

Log on to WebCenter Spaces as any user, and create a new page in your Personal Space, but clicking on Create Page… in the Page Actions menu as shown.

You need to provide a name for your page, I called mine PeopleSoft Page, and select a layout, I used Stretch.

Now click on the Add Content button in the area where you want to put your portlet.  I used the main (lower) area.  With the Stretch layout that I selected, this one will expand to fill all available space on the page.

Composer will appear, and you can navigate into the Portlets folder to find our new portlet.

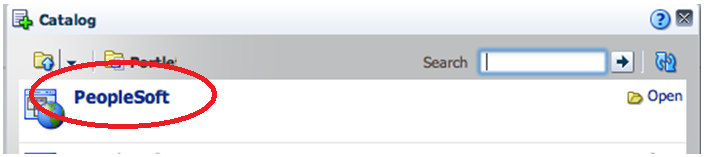
Here you will see the name you gave to the producer, PeopleSoft in my case.  Click on this to drill down to the portlet(s).

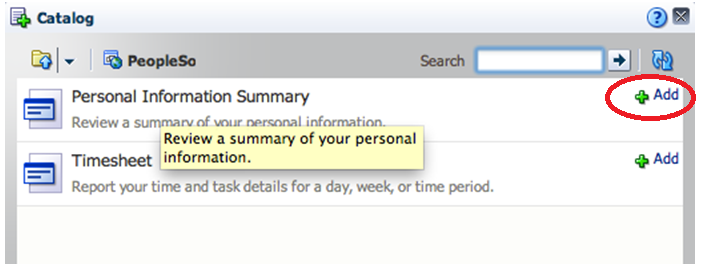
Now we see the two portlets that I exposed in PeopleSoft.  I am going to add the Personal Information Summary to my page.  Click on the Add link to do this, then the Close button to close Composer and return to your page.

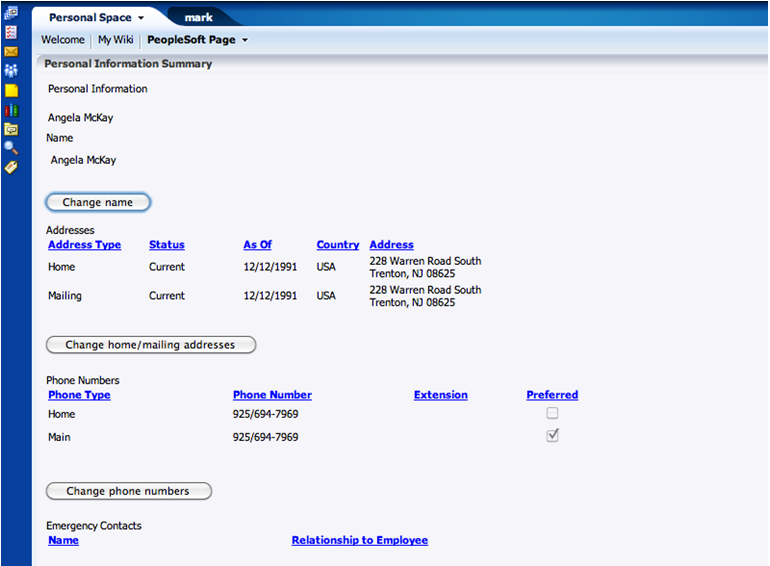
By now the portlet will have probably rendered in your page and will look a bit like the image below.  Click on Save and then Close to get out of page editing mode and back to normal user/view mode.

Since we have not set up any single sign on yet, the PeopleSoft portlet is asking us to sign on to PeopleSoft.  Here I am using one of my demo users to log in to PeopleSoft:

And now we see the PeopleSoft portlet presenting information to us.  It’s as easy as that!

Of course, you can add more portlets to the page, and resize the portlet, and so on.  All the normal WebCenter capabilities are available.

4       Adding security

It may be convenient to set up automatic sign on so that users who are logged on the WebCenter will not be required to log on again to PeopleSoft.  This can be done by configuring WS-Security on both the WebCenter and PeopleSoft servers.

4.1     Creating certificates for use with WS-Security

Both WebCenter and PeopleSoft will need to have X.509 certificates to enable use of WS-Security.  Certificates can be a little confusing, so let’s start with a diagram that describes what we want to achieve.

WebCenter will have a keystore containing its private key orakey, plus PeopleSoft’s public key rootCA, and the certificate that PeopleSoft will use as the WS-Security recipient when we set up the automatic sign on qe_local.   qe_local is trusted because it was signed by rootCA which is trusted.

PeopleSoft will have a keystore containing its private key rootCA, plus WebCenter’s public key orakey, and the certificate that PeopleSoft will use as the WS-Security recipient when we set up the automatic sign on qe_local.

4.1.1     Create keystores for WebCenter and PeopleSoft

To create the keystores for WebCenter and PeopleSoft, we will use the keytool included in the Java Development Kit (JDK).

First we create a directory in the Middleware Home to keep our keystore and related artefacts.

C:\> cd \Oracle\Middleware
C:\Oracle\Middleware> md keystore
C:\Oracle\Middleware> cd keystore

The first step is to create a new keystore and a RSA key pair.  Note that this whole command is entered on one line.  It is shown here on multiple lines for ease of reading only.  You need to add in the appropriate Common Name (CN) as shown in bold.  Here we have used the fully qualified hostname of the WebCenter server, with the hostname as a cn and each domain name component as a dc.  You also need to provide a password for the key (keypass) and for the keystore (storepass), as shown.

C:\Oracle\Middleware\keystore> ..\jdk160_14_R27.6.5-32\bin\keytool
-genkeypair
-keyalg RSA
-dname "cn=webcenter,dc=au,dc=oracle,dc=com"
-alias orakey
-keypass welcome1
-keystore webcenter.jks
-storepass welcome1
-validity 1064

Now we will create a keystore and key pair for PeopleSoft, as shown. 

C:\Oracle\Middleware\keystore> ..\jdk160_14_R27.6.5-32\bin\keytool
-genkeypair
-keyalg RSA
-dname "cn=peoplesoft,dc=au,dc=oracle,dc=com"
-alias rootCA
-keypass welcome1
-keystore peoplesoft.jks
-storepass welcome1
-validity 1064

4.1.2     Create certificates

In this example, we are going to use self signed certificates.  This is suitable for test or development systems, but in a production system you may wish to purchase certificates from a trusted external Certificate Authority.  Alternatively, you may have already purchased a signing certificate and have your own certificate authority.  In this case, you will need to get your certificates signed by the administrator of the certificate authority.

The following command is used to create a new certificate which we will call orakey.

C:\Oracle\Middleware\keystore>../jdk160_14_R27.6.5-32/bin/keytool
-exportcert
-v
-alias orakey
-keystore webcenter.jks
-storepass welcome1
-rfc
-file orakey.cer
Certificate stored in file <orakey.cer>

Now we import that certificate into the WebCenter keystore with a new name, webcenter_spaces_ws.

C:\Oracle\Middleware\keystore> ../jdk160_14_R27.6.5-32/bin/keytool
-importcert
-alias webcenter_spaces_ws
-file orakey.cer
-keystore webcenter.jks
-storepass welcome1
Certificate already exists in keystore under alias <orakey>
Do you still want to add it? [no]:  yes
Certificate was added to keystore

The following command is used to create a new certificate which we will call qe_local.

C:\Oracle\Middleware\keystore>../jdk160_14_R27.6.5-32/bin/keytool
-exportcert
-v
-alias qe_local
-keystore peoplesoft.jks
-storepass welcome1
-rfc
-file qe_local.cer
Certificate stored in file <qe_local.cer>

Now we import that certificate into the PeopleSoft keystore with a new name, qe_local.

C:\Oracle\Middleware\keystore> ../jdk160_14_R27.6.5-32/bin/keytool
-importcert
-alias qe_local
-file qe_local.cer
-keystore peoplesoft.jks
-storepass welcome1
Certificate already exists in keystore under alias <rootCA>
Do you still want to add it? [no]:  yes
Certificate was added to keystore

4.1.3     Adding the certificates into the other party’s keystore

We also need to import this qe_local certificate into the WebCenter keystore, and the orakey certificate into the PeopleSoft keystore.

C:\Oracle\Middleware\keystore> ../jdk160_14_R27.6.5-32/bin/keytool
-importcert
-alias qe_local
-file qe_local.cer
-keystore webcenter.jks
-storepass welcome1
C:\Oracle\Middleware\keystore> ../jdk160_14_R27.6.5-32/bin/keytool
-importcert
-alias orakey
-file orakey.cer
-keystore peoplesoft.jks
-storepass welcome1

4.1.4     Copying the keystores into the correct locations

The WebCenter keystore can be copied into place using the following command:

C:\Oracle\Middleware\keystore> copy webcenter.jks
..\user_projects\domains\base_domain\config\fmwconfig

As for PeopleSoft, the keystore can be copied into place using the following command:

C:\Oracle\Middleware\keystore> copy webcenter.jks 
%PS_HOME%\webserv\%DOMAIN_NAME%\applications\peoplesoft\pspc.war\WEB-INF\classes\

4.2     Installing certificates in WebCenter

Once the file is in place, you need to login to Enterprise Manager to configure it.  This will be at http://your.webcenter.server:7001/em.  You need to login as an administrator, like the weblogic user for example.

Navigate to Farm_base_domain -> WebLogic Domain -> base_domain

From the context menu select Security -> Security Provider Configuration

Scroll down to Keystore, expand it, and click Configure

It is good practice to reset the configuration first.  To do this, uncheck the box Configure Keystore Management and click OK.  Then go back to Keystore, and click Configure again.

This time, check the box Configure Keystore Management and enter the following information as shown in the image below.

Keystore Path                  ./webcenter.jks
Password                       welcome1
Signature Key Alias            orakey
Signature Password             welcome1
Encryption Key Crypt Alias     orakey
Crypt Password                 welcome1

After you click on OK to save these settings, you will need to restart the WebLogic Admin Server (and the managed servers).

4.3     Installing certificates in PeopleSoft

To install the certificates in PeopleSoft, we first log in to PeopleSoft as the PS administrative user and navigate to PeopleTools -> Security -> Security Objects -> Digital Certificates.


Click on the + to add a new Root CA.  Choose the orakey.cer file we created earlier.  The alias must be orakey too – it needs to be exactly the same as on the WebCenter system.  Then click on the + again and add a Remote certificate, again choosing orakey.cer and using the alias orakey.

Once these steps are completed, you should see the certificates listed as in the example below.

4.4     Updating the WebCenter WSRP Producer registration with WS-Security information

We need to add some additional information to the WSRP Producer in WebCenter to tell it how about the security information to use with PeopleSoft.  Return to the WSRP Producer configuration screen (as described earlier) by logging on to Enterprise Manager and navigating to Farm_base_domain -> WebCenter -> WebCenter Spaces -> WebCenter and then in the popup WebCenter context menu to Settings -> Service Configuration.  Select Portlet Producers from the list on the left and then highlight your PeopleSoft WSRP Producer and click on the Edit button.

You need to fill in the security details as shown in the diagram below.

First, select WSS 1.0 SAML Token with Message Integrity in the Token Profile field, then select Custom for the Configuration field.  This will make the other fields available for editing.  You need to set the as follows (note that the values may be different for your environment):

Issuer Name              = www.oracle.com
Store Path               = c:/oracle/middleware/keystore/webcenter.jks
Password                 = welcome1
Signature Key Alias      = orakey
Signature Key Password   = welcome1
Encryption Key Alias     = orakey
Encryption Key Password  = welcome1

Note that we will make similar setting in PeopleSoft later and it is important that values you set in the two environments are identical.

4.5     Updating the PeopleSoft WSRP security options

To set the WS-Security configuration for PeopleSoft, we use the redeployWSRP batch file located in %PS_HOME%\webserv\%DOMAIN_NAME%\bin.

> redeployWSRP 5

In this case, we choose option 5 which redeploy the WSRPBaseService in PeopleSoft and set the security mode to WS-Security SAML Token with encryption.

4.6     Mapping users in PeopleSoft

If the usernames (SAML subject names) in WebCenter and PeopleSoft do not match, you may need to create mappings in PeopleSoft.

To do this, we log into PeopleSoft application as PS, and navigate to PeopleTools -> Security ->SAML Administration Setup -> SAML Inbound Setup.

Next we click on Add a New Value and enter the information required.  An example is shown below that maps the WebCenter user PAT to PeopleSoft user HCRAUS_KA0003.  Note that the Issuer must match the one that was specified in the WebCenter WSRP Producer registration’s security configuration.  The Qualifier should also be set to this value.

The values are set as follows:

  • Certificate Alias: The same name as the Root CA certificate
  • Issuer:  WWW.ORACLE.COM
  • SubjectName: The WebCenter user ID
  • QualifierName: WWW.ORACLE.COM
  • Mapping PeopleSoft UserID: The PeopleSoft user that WebCenter user is mapped to.

4.7     Validate Local Node Definition in PeopleSoft

We also need to make sure the Local Node Definition in PeopleSoft is set up with the correct authentication option.

To do this, we log on to PeopleSoft as the PS user and navigate to PeopleTools -> Portal -> Node Definitions, then click Search button to find the local node.

In the node definition page of the local node (in this case PSFT_HR), select Password from the drop-down list for Authentication Option and click on Save.

4.8     A final important consideration

When using WS-Security for automatic sign on to PeopleSoft, in order for the SAML assertion to be valid, the date/time on the PeopleSoft and WebCenter servers must be synchronized.  If this is problematic, then the PeopleSoft web server’s time may be set to be slightly ahead of WebCenter server.

Posted in Uncategorized | Tagged , , , , | 6 Comments

Installing WebLogic Server 10.3.3 on Ubuntu (64-bit)

Update:  This post describes a method for installing WebLogic Server 10.3.3 which involves first installing 10.3.2 and then patching up to 10.3.3.  It also now possible to just install 10.3.3 directly.  If you are an Oracle customer, you can download the 10.3.3 installer from eDelivery.

Another update:  You can now download a 10.3.3 installer from Oracle Technology Network, and also a “zip” distribution which you don’t need to “install” – just unzip -very handy for developers or for scripting test environments.

Yet another update: If you are reading this post because you are interested in installing SOA Suite, BPM Suite or WebCenter on a 64-bit Linux system, you may find more of what you are looking for in this post.  You may also want to install an Oracle database on Ubuntu?  If so, please take a look at this post.

Today, I was asked how to install the 64-bit (generic) version of WebLogic Server 10.3.3 on 64-bit Ubuntu.  For this post, I am using 64-bit Ubuntu 10.04 LTS Lucid Lynx, running in Oracle VirtualBox 3.20.

First we need to install the Sun JDK, which is a supported JDK for WebLogic Server.  As root, install the Sun JDK:

# cd /usr/lib/jvm
# sh <PATH>/jdk-6u20-linux-x64.bin

Next, we install WebLogic Server 10.3.2.  You can download this from Oracle Technology Network.  You want the Generic version of the Oracle WebLogic Server 11gR1 (10.3.2) – Package Installer.  Note: 10.3.2, not 10.3.3.

To install this, we run the following command, as a normal user:

$ /usr/lib/jvm/jdk1.6.0_20/bin/java -jar wls1032_generic.jar

After a few moments, the installer will appear.  Click on the Next button to start.

On the next screen we can set the location for our “Middleware Home.”  This is the directory where WebLogic Server will be installed.  I just accepted the default.

On the next screen you can provide your Oracle Support credentials (if you wish to) so that you can be notified of any important updates.  I just unchecked the box and clicked on Next to continue.  You will have to confirm in the popup box as shown.

On the next screen, we can select the type of installation.  I chose Typical and clicked on Next.

Next we select the JDK we wish to use.  This should already be showing the one we just installed and used to start the installation program, so you can go ahead and click on Next.

Next, we can specify the product installation directory.  I just took the default and clicked on Next.

Now we get a summary screen.  Click on Next to start the installation.

The installation will run, and we can watch the progress.

Once installation is completed we will see the following screen. Uncheck the Run Quickstart and then click on Done to exit the installation program.

We now have WebLogic Server 10.3.2 installed.  Next we need to download the 10.3.3 Upgrade Installer from Oracle Support.  If you have not used Oracle Support (formerly known as Metalink) for a while, you may notice it looks a little different now!

Once you have signed in go to the Patches & Updates section.

Click on the link for Product or Family (Advanced Search).

In the Product field, type in Oracle WebLogic Server, or select it from the list.

In the Release field, use the drop down box to select WLS 10.3.3.

In the Platform field, use the drop down to select Linux x86-64.

Click on the Search button.  You should get the following patch in your results.  Click on the patch number to open details of the patch.

On the right hand side, click on the Download button to download the patch and then unzip it.

This will give you a README file and the Upgrade Installer, called wls1033_upgrade_generic.jar.

To run the upgrade installer, we issue the following command:

$ /usr/lib/jvm/jdk1.6.0_20/bin/java -jar wls1033_upgrade_generic.jar

After a few moments, the Upgrade Installer will start.  Warning:  You may experience a little Déjà vu at this point!  Click on the Next button to start.

First, we need to select the Middleware Home to use.  Pick the same one we used earlier to install WebLogic Server 10.3.2.  This should be automatically selected for you.  Click on Next.

Again you can provide your Oracle Support credentials, or not, as you choose.

A summary screen will be displayed.  You may notice that WebLogic Server 10.3.3 includes some new options.  Click on Next to continue.

If you accept the defaults and leave that option selected, like I did, you will get a screen confirming where you want to install it.  Just accept the defaults again and click on Next to continue.

The installation will run, and you can watch progress.

Again, uncheck the Run Quickstart option and click on Done to exit the installer.

Now that the installation is finished, we want to create a domain.  This is done using the “config” script.

$ cd /home/mark/Oracle/Middleware/wlserver_10.3/common/bin
$ ./config.sh

After a few moments, the Configuration Wizard will start.  Select Create a new WebLogic Domain and click on Next to get started.

On the next screen you get the option to add some extensions.  I just accepted the defaults and clicked on Next.

Here you can give your domain a name and set the location where it will be stored.  Again, accept the defaults and click on Next.

On the next screen you need to set the administrator’s password by entering it twice.  Then click on Next.

Now you can select whether you want the server to run in Development or Production Mode, and which JDK to use.  Again, just accept the defaults and click on Next.

Here you get the option to change many other settings, and next time you create a domain, you might like to experiment with some of those, instead of just taking the defaults all the time!  But for now, let’s just click on Next again.

Here we see the summary screen, click on Next.

The domain will be created, and we can watch the progress.

After a few moments, the domain creation will be finished and we can click on Done to exit the Configuration Wizard.

Now we are ready to start up our server using the following commands:

$ cd /home/mark/Oracle/Middleware/user_projects/domains/base_domain
$ ./startWebLogic.sh

As the server starts up, if you look carefully at the output messages you may notice that it tells us it is running in 64-bit mode.

Once you get the message telling you the server is RUNNING, you can open up a browser and go to the WebLogic Server console.  This will be at http://yourserver:7001/console, and you can log on with the user weblogic and the password you created a moment ago.

When you click on Log In, you will see the console:

So, there we have it, a 64-bit WebLogic Server running on 64-bit Ubuntu.  The procedure for other Linux variants, Solaris, etc. is pretty similar and even installing on 64-bit Windows is not too different!  Good luck.

P.S.:  If there are any Ubuntu developers reading this post, I have not used Ubuntu for years and I must say that it looks fantastic and was very easy to install and use.  Congratulations on the great work!

Posted in Uncategorized | Tagged , , | 7 Comments

Rename all the files in a directory to add a prefix

This is a bit off topic, but it is something I frequently want to do!

When I am producing a new post I usually end up with a number of images that I want to include.  I normally create these in PowerPoint, and then save them as PNG images.  This gives me a directory with a bunch of files called Slide1.png, Slide2.png, etc.

I like to add a prefix to make it easier and cleaner and ensure there are no name clashes, but how to do this quickly and easily?

This is the fastest was I have found to do this:

for file in $(echo *.png); do mv ${file} ubuntu.${file}; done

I run this in a terminal window, and it does the job, leaving me with a bunch of files call ubuntu.Slide1.png, ubuntu.Slide2.png, etc. (in this case).

Posted in Uncategorized | Tagged | Leave a comment

Exposing E-Business Suite services using the Integrated SOA Gateway

Oracle E-Business Suite Release 12 introduced a new “Integrated SOA Gateway” that makes it very easy to expose functionality from E-Business Suite as web services.  This allows much easier integration to and from E-Business Suite.

In this post, we look at how to expose a piece of functionality in E-Business Suite as a service.  Here we are using Oracle E-Business Suite 12.1.2, a “Vision” system.

First we log on to E-Business Suite as the SYSADMIN user.

Next we navigate to the Integrated SOA Gateway responsibility and into the Integration Repository, as shown in the image below.

For this example, we will use the Price Request.  This is found under Order Management Suite then Advanced Pricing and Price List as you can see highlighted on the left hand side of the image below.  Then select Price Request from the list of integration points.  You will see a screen like the one below, that provides details of this integration point.  You can see that in this case, it is a PL/SQL API.  On the top right of this screen, there is a new button called Generate WSDL that we can use to easily expose this PL/SQL API (or any other integration point) as a web service.  Click on that now.

After two or three seconds you should get a confirmation message, like the one below, to let you know this was completed successfully.  Next we need to enable this new service.  This is done by clicking on the Deploy button which is highlighted in the image below.

Again, after a few seconds, your screen should update to look like the one below.  You can now see a link to the service description (WSDL) that can be used to call this service from other applications, systems, etc.

You can click on that View WSDL link to see the WSDL code.  Below is the first part of the WSDL for the above example.

Note: Make sure you open the WSDL in a new window or tab, we are not finished with this page yet!  You can do this by right clicking on the link and selecting Open in new tab or similar from the popup menu (this varies from browser to browser).

The final step is to grant access to the service, so that we will be able to invoke it.  To do this, we expand the list of operations in the last part of the interface page in Integration Repository , then check the box next to the interface we want to grant access to, and click on the Grant Access button.

Now enter the username for the user you want to grant access to, or use the search button to find the user.  In this example, it will be sufficient to grant access to ASADMIN.

Then save your changes.  Your screen should now look like this:

That’s all there is to it!  Certainly much easier than how we would have done this in the past.

Posted in Uncategorized | Tagged , , | 10 Comments

Speeding up VMWare

I was working with a very large VMWare image today, containing Oracle E-Business Suite R12.  The image is located on an external USB drive, simply because it is too large to fit on the internal disk on the available host machine.

It was running very, very slow, in fact so slow that it was completely unusable.

A little bit of research turned up some settings that can be used in this kind of situation.  The problem seems to be that VMWare creates a file in the same directory as the configuration (vmx) file where it stores the memory of the running guest machine.  This means there is a lot of I/O contention on the USB drive, not something that a lot of USB drives are very good at handling.

Happily, there is an option to make VMWare use RAM on the host to contain the guest’s memory, and to create any backing files on the main disk instead of the external disk.

Listed below are the settings I discovered and added into my VMX file.  In addition to this, I changed the option in VMWare Workstation’s Edit, Preferences menu option, in the Memory tab, to keep all of the guest memory in the host RAM.  I also tried this on VMWare Server.  The option is in a different place, but it does the same thing.

mainMem.useNamedFile=FALSE      ### this line is for Windows hosts
mainMem.backing="unnamed"       ### this line is for Linux hosts
sched.mem.pshare.enable = "FALSE"
MemTrimRate = 0
prefvmx.useRecommendedLockedMemSize = "TRUE"
prefvmx.minVmMemPct = "100"

The result of these changes was a dramatic performance improvement.  Actions that were previously taking several minutes before timing out or failing were now completely successfully in just seconds.

I am posting these settings here in the hope that they help others too.  I know I will be using them again next time I need to run a large VM!


Posted in Uncategorized | Tagged , | 8 Comments

Upgrading WebCenter and SOA Suite from 11.1.1.2 to 11.1.1.3

If, like me, you have an existing WebCenter and SOA Suite 11.1.1.2 installation, that you need to upgrade to the new 11.1.1.3 release, you may find the task a little daunting, as I did.  However, a little bit of careful research payed off, and I found that the Installation Planning Guide, particularly this section, are particularly useful and make the process very simple.

First, you need to upgrade your WebLogic Server from 10.3.2 to 10.3.3.  There is a WebLogic Server 10.3.3 installer on OTN, but this is not what you need.  You actually need to log on to Oracle Support (formerly known as Metalink) and download the Update Installer.  Full instructions on how to find it are included in the documentation linked to above.

You need to make sure you download the same kind of installer as you used to install your 10.3.2 server.  That means, if you installed the “generic” version, as opposed to the “win32” version or some other version, you need to make sure you download the “generic” updater.  If you installed the “linux” version, you need the “linux” updater, and so on.

With that completed, you then need to run the patch installers.  In my case, I ran the WebCenter 11.1.1.3 patch installer, then then SOA 11.1.1.3 patch installer.

The WebCenter 11.1.1.3 patch mainly contains fixes and updates, not a lot of new features, however there are some including an iPhone application and better integration with Microsoft Office 2007.

In contrast, the SOA 11.1.1.3 patch adds a lot of new functionality, most notable is the BPM 11g product which is installed as part of the patch, and adds the ability to use BPMN 2.0 in your composites – but that’s a whole other story.  The patch also adds the “BPEL domain” support that 10g users would be familiar with, and some other enhancements.

The final step is to run the Patch Set Assistant.  This will update your database schemas to suit the new patch.

After these three steps, you can then start up your domain at 11.1.1.3 level!   Not so hard after all!  Enjoy!

PS: There are some other post installation steps documented that you may want or need to do, depending on your installation.  Please be sure to read through them and carry out any extra steps that may apply.

Posted in Uncategorized | Tagged , , , | Leave a comment

Configuring the Web Clipping portlet to use an HTTP Proxy

Today, I was setting up an internal (intranet) deployment of WebCenter and one of the things I needed to display was the company share price, pulled from the Internet.  In order to do this, I used the built in Web Clipping portlet.  However, it needs to be configured to use an HTTP proxy so that it can access content on the Internet.

This is done by adding some settings to the provider.xml configuration file used by the portlet.  This configuration file is stored under the domain directory.  In my case, it is located here:

C:\Oracle\Middleware\user_projects\domains\base_domain\servers\
WLS_Portlet\tmp\_WL_user\portalTools_11.1.1.2.0\vuzpes\war\WEB-INF\
providers\webClipping\provider.xml

Note that the directory in bold and underlined is an automatically generated name.  Yours will probably have a different name.  It gets created when you add the web clipping portlet to a page.  You will want to do that first, if you have not already, so that the configuration file we need will be created.

If you open up this file, and scroll down about 30 or so lines, you will find that there is a long commented section that explains all of the proxy settings.  Following this, there is a sample set of proxy settings, as shown below:

 <!-- proxy information: Fill the following up if you have a proxy                           server between the provider and external sites.
  <proxyInfo class="oracle.portal.provider.v2.ProxyInformation">
    <httpProxyHost>yourproxy.yourdomain.com</httpProxyHost>
    <httpProxyPort>80</httpProxyPort>
    <dontProxyFor>.yourdomain.com</dontProxyFor>
  </proxyInfo>
  -->
Note that these are also commented out in the file.  You will need to update them with your proxy server settings, and also uncomment them.  There are several other settings that allow you to use a variety of different type of proxies, including those that require a user sign on.  For a basic HTTP proxy, you will just need to set the two items shown in bold in the sample above.
Once you have updated this file, you should restart for WLS_Portlet managed server.  Then your web clipping portlet will be able to access the Internet through your HTTP proxy.
Posted in Uncategorized | Tagged , , | Leave a comment