
In this post I want to demonstrate how to use Oracle Transactional Event Queues (TEQ) to propagate messages/events across regions. I will use two Oracle Autonomous Databases running in Oracle Cloud, one in Ashburn, VA and one in Phoenix, AZ (about 2,000 miles apart).
Of course, there are a lot of reasons why you might want to propagate events like this, and you don’t necessarily have to do it across geographic regions, you might just want to do it across two database instances in the same data center, or even just two topics in the same database!
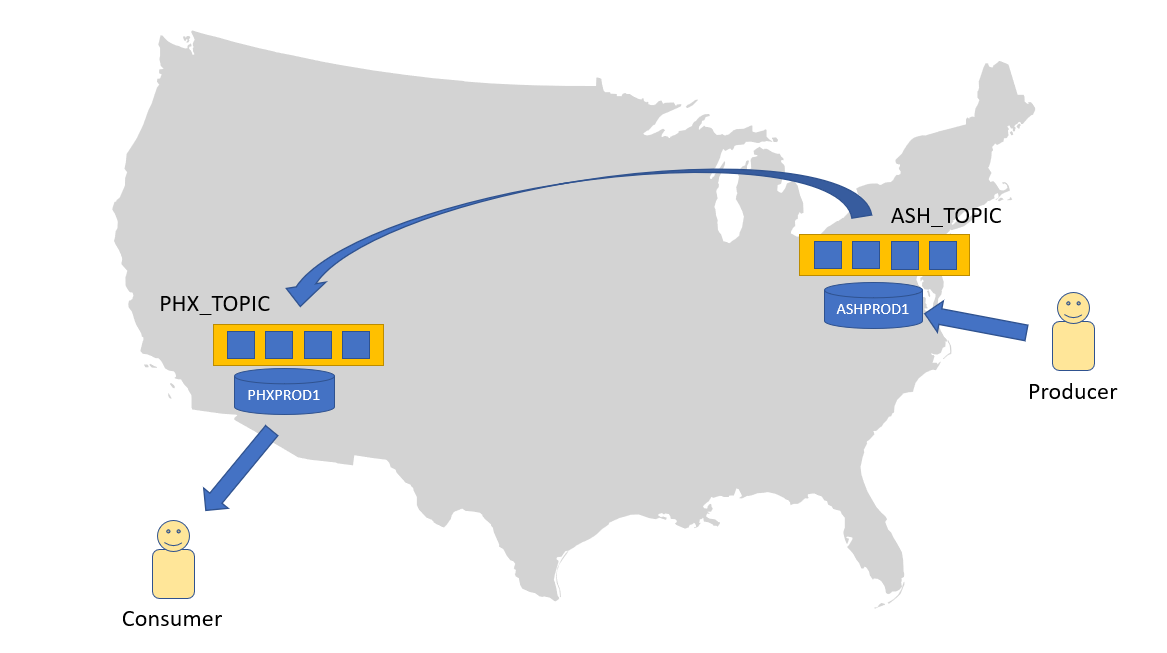
Here’s a quick diagram of what we are going to build. We are going to use the JMS Pub/Sub model. Our producer will connect to the ASHPROD1 instance and put messages onto the topic ASH_TOPIC. Messages will be propagated from this topic to the topic PHX_TOPIC in the PHXPROD1 instance. Our consumer will connect to PHXPROD1 and consume messages from there.
To get started, let’s create two databases. To follow along, you’ll need an Oracle Cloud account – you can do this with the “Always Free” account using the 21c version of the Autonomous Database, so you can try this without spending any money 🙂 You can also use 19c if you prefer.
Creating the databases
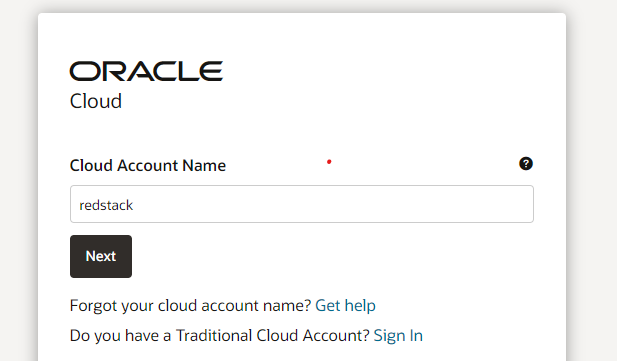
First we log into the Oracle Cloud Infrastructure (OCI) Console at https://cloud.oracle.com. Enter your cloud account name and hit the “Next” button.
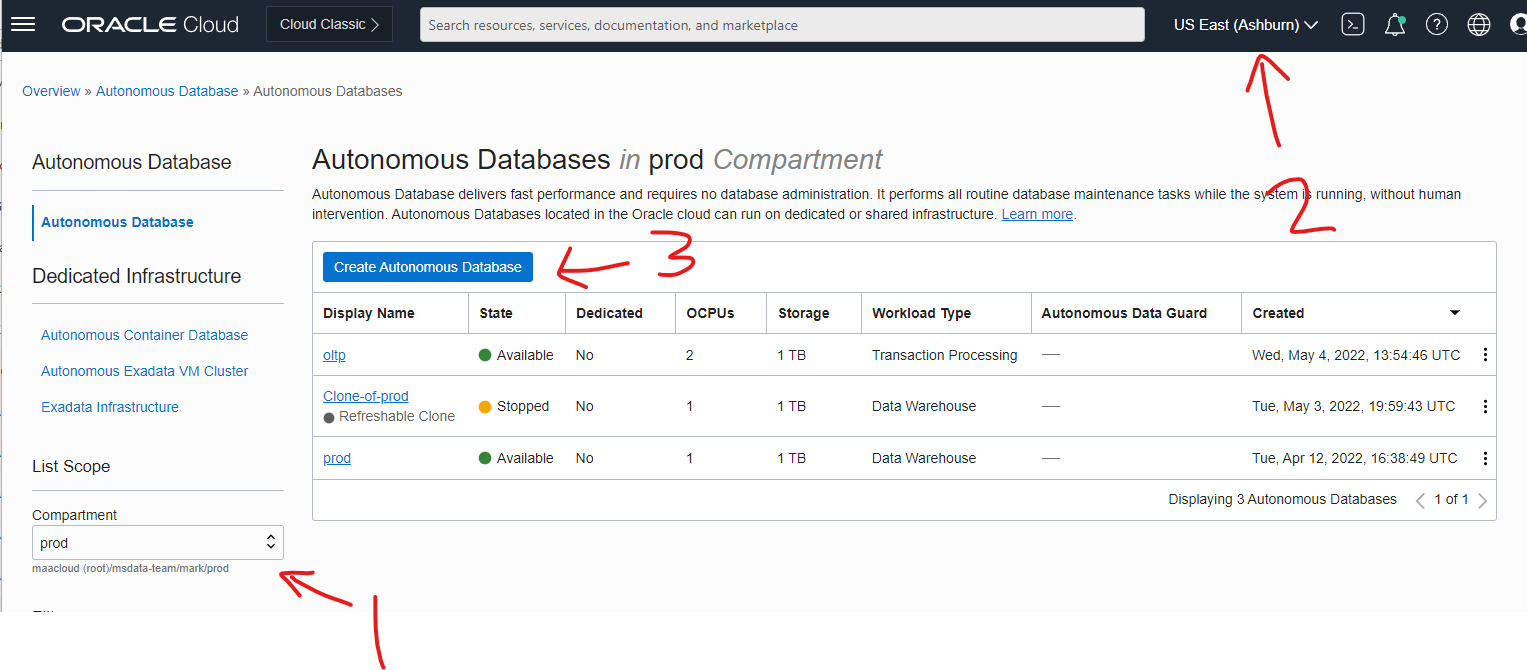
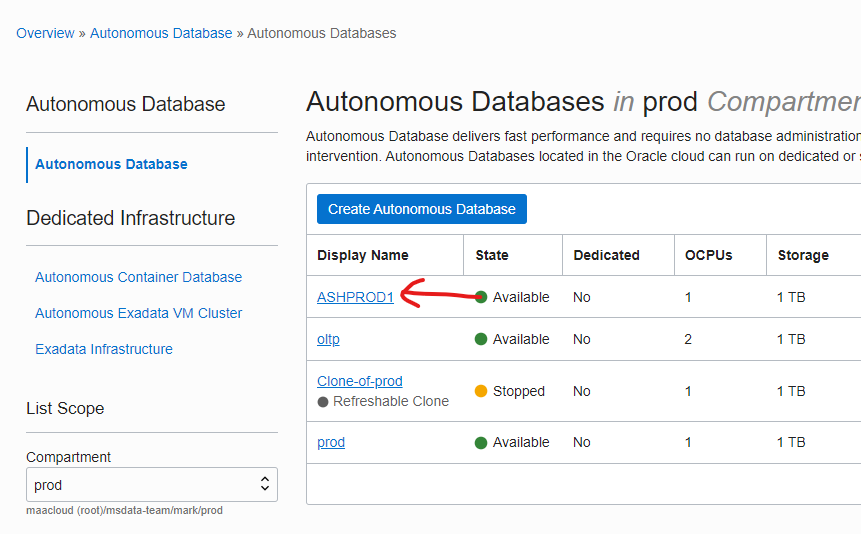
After you log in, click on the “hamburger” (three lines) menu (1) and go to “Oracle Database” (2) and then “Autonomous Database” (3) as shown:

Choose your compartment (1), and the region (2) (I’ll use Ashburn and Phoenix – use any two regions you like, or two in the same region will work too), then click on the “Create Autonomous Database” (3) button:
In the dialog, we need to give the database a name, I used ASHPROD1. Choose “Transaction Processing” as the workload type and “Shared Infrastructure” as the deployment type:

You can accept the default 19c database (or toggle that “Always Free” switch to use 21c). The default 1 OCPU, 1 TB is fine for this exercise. Also provide a password for the administrator (don’t forget it!):

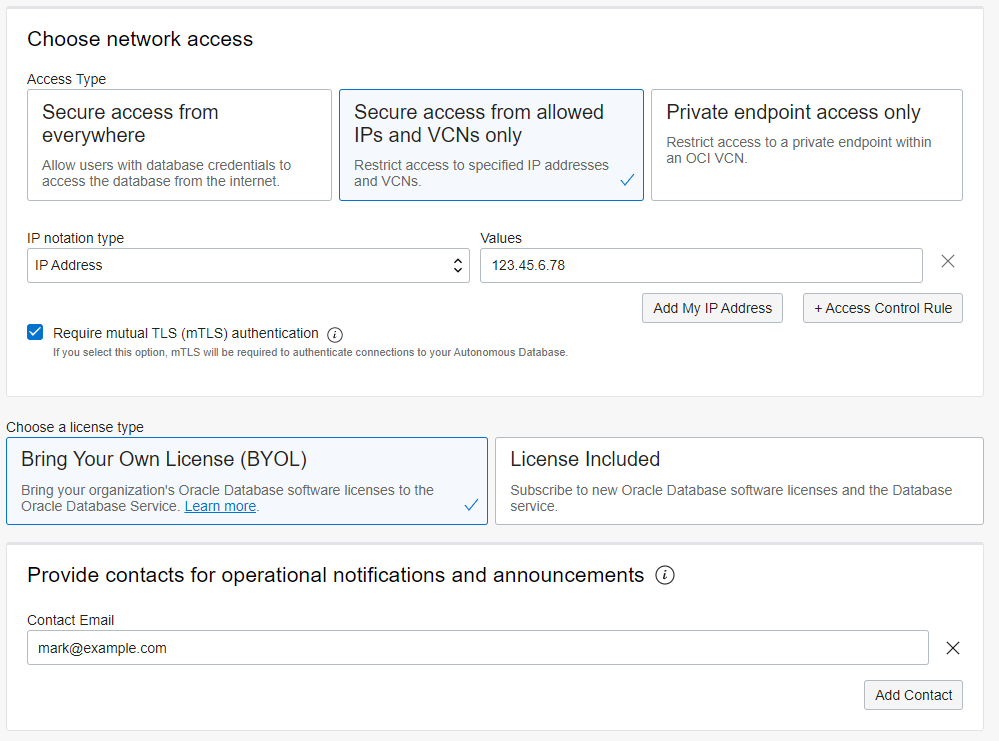
In the “Choose network access” section, choose the option for secure access and click on the “Add My IP Address” button. Choose the “Bring You Own License (BYOL)” option and provide an email address for the administrator:
Then click on the “Create Autonomous Database” button to create the database.
Now choose the second region, e.g. Phoenix, in the top right corner of the OCI Console and repeat this same process to create a second database, for example called PHXPROD1. This time though, choose the “secure access from anywhere” option, since we are going to need to be able to have ASHPROD1 connect to this instance too.
Obtain Database Wallets
So now we have our two databases. Let’s download the wallets so that we can connect to them. The database wallets contain the necessary information to connect to, and authenticate the database.
In the OCI Console, click on the database name to see the details of the database:
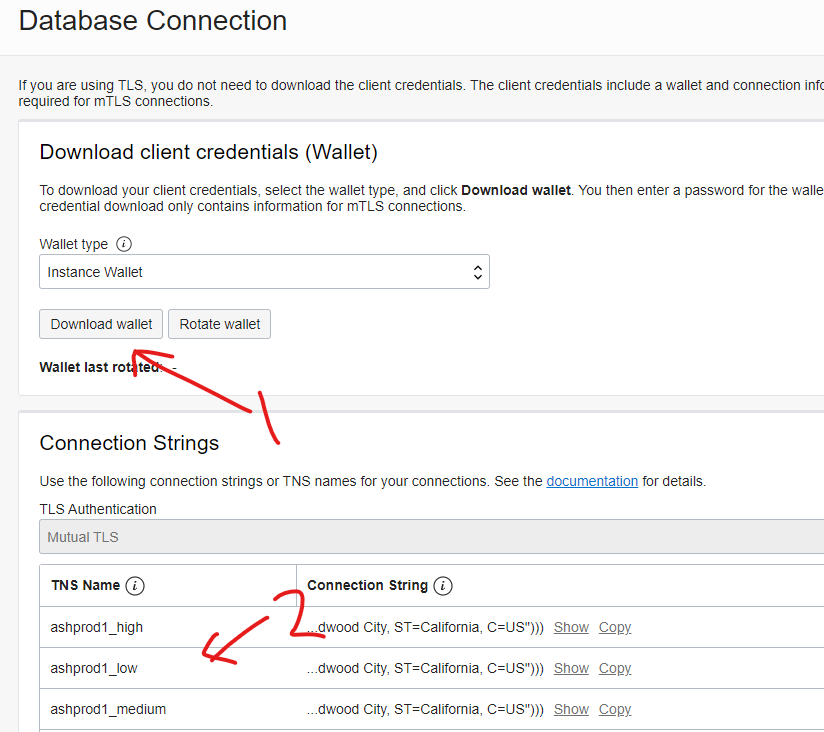
Next, click on the “DB Connection” button:

You will click on the “Download wallet” button (1) to get the wallet file, but while you are here, notice the connection strings (2) – we’ll use one of those later.
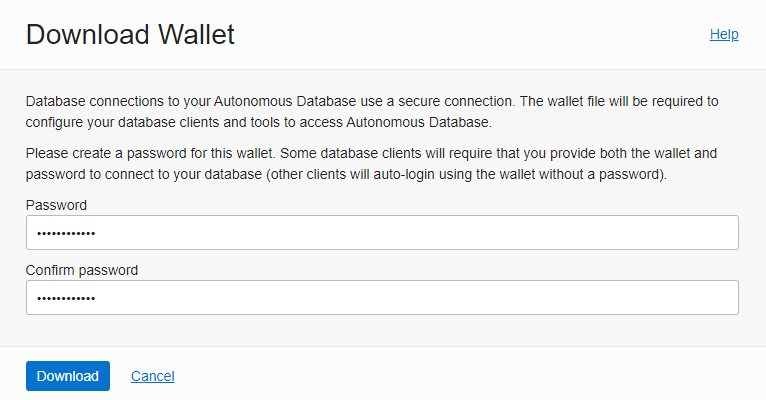
After you click on the button, provide a password for the wallet, and then click on the “Download” button:
Repeat this for the other database.
Creating our consumer
Let’s create a new project and write our consumer code. We’ll use Maven to simplify the dependency management and to make it easy to run our consumer. Let’s create a new directory and unzip our two wallets into this directory. So we should see something like this:
/home/mark/src/redstack
├── ASHPROD1
│   ├── README
│   ├── cwallet.sso
│   ├── ewallet.p12
│   ├── ewallet.pem
│   ├── keystore.jks
│   ├── ojdbc.properties
│   ├── sqlnet.ora
│   ├── tnsnames.ora
│   └── truststore.jks
└── PHXPROD1
    ├── README
    ├── cwallet.sso
    ├── ewallet.p12
    ├── ewallet.pem
    ├── keystore.jks
    ├── ojdbc.properties
    ├── sqlnet.ora
    ├── tnsnames.ora
    └── truststore.jks
You will need to edit both of those sqlnet.ora files and update the DIRECTORY so that it is correct, for example, we would change this:
WALLET_LOCATION = (SOURCE = (METHOD = file) (METHOD_DATA = (DIRECTORY="?/network/admin")))
SSL_SERVER_DN_MATCH=yes
To this;
WALLET_LOCATION = (SOURCE = (METHOD = file) (METHOD_DATA =
  (DIRECTORY="/home/mark/src/redstack/PHXPROD1")))
SSL_SERVER_DN_MATCH=yes
Let’s add a Maven POM file to set up our project. I am assuming you have Maven and a JDK installed. If not – go get those now 🙂 I am using Maven 3.8.4 and Java 17.0.3. Create a file called pom.xml with this content:
<?xml version="1.0" encoding="UTF-8"?>
<project xmlns="http://maven.apache.org/POM/4.0.0"
    xmlns:xsi="http://www.w3.org/2001/XMLSchema-instance"
    xsi:schemaLocation="http://maven.apache.org/POM/4.0.0 https://maven.apache.org/xsd/maven-4.0.0.xsd">
    <modelVersion>4.0.0</modelVersion>

    <groupId>com.wordpress.redstack</groupId>
    <artifactId>propagation</artifactId>
    <version>0.0.1-SNAPSHOT</version>
    <name>propagation</name>
    <description>Demo of TEQ propagation</description>

    <properties>
        <maven.compiler.target>17</maven.compiler.target>
        <maven.compiler.source>17</maven.compiler.source>
    </properties>

    <dependencies>
        <dependency>
            <groupId>javax.transaction</groupId>
            <artifactId>javax.transaction-api</artifactId>
            <version>1.2</version>
        </dependency>
        <dependency>
            <groupId>com.oracle.database.jdbc</groupId>
            <artifactId>ojdbc8</artifactId>
            <version>19.3.0.0</version>
        </dependency>
        <dependency>
            <groupId>com.oracle.database.messaging</groupId>
            <artifactId>aqapi</artifactId>
            <version>19.3.0.0</version>
        </dependency>
        <dependency>
            <groupId>com.oracle.database.security</groupId>
            <artifactId>oraclepki</artifactId>
            <version>19.3.0.0</version>
        </dependency>
        <dependency>
            <groupId>com.oracle.database.security</groupId>
            <artifactId>osdt_core</artifactId>
            <version>19.3.0.0</version>
        </dependency>
        <dependency>
            <groupId>com.oracle.database.security</groupId>
            <artifactId>osdt_cert</artifactId>
            <version>19.3.0.0</version>
        </dependency>
        <dependency>
            <groupId>javax.jms</groupId>
            <artifactId>javax.jms-api</artifactId>
            <version>2.0.1</version>
        </dependency>
        <dependency>
            <groupId>javax.transaction</groupId>
            <artifactId>jta</artifactId>
            <version>1.1</version>
        </dependency>
    </dependencies>

    <profiles>
        <profile>
            <id>consumer</id>
            <build>
                <plugins>
                    <plugin>
                        <groupId>org.codehaus.mojo</groupId>
                        <artifactId>exec-maven-plugin</artifactId>
                        <version>3.0.0</version>
                        <executions>
                            <execution>
                                <goals>
                                    <goal>exec</goal>
                                </goals>
                            </execution>
                        </executions>
                        <configuration>
                            <executable>java</executable>
                            <arguments>
                                <argument>-Doracle.jdbc.fanEnabled=false</argument>
                                <argument>-classpath</argument>
                                <classpath/>
                                <argument>com.wordpress.redstack.Consumer</argument>
                            </arguments>
                        </configuration>
                    </plugin>
                </plugins>
            </build>
        </profile>
        <profile>
            <id>producer</id>
            <build>
                <plugins>
                    <plugin>
                        <groupId>org.codehaus.mojo</groupId>
                        <artifactId>exec-maven-plugin</artifactId>
                        <version>3.0.0</version>
                        <executions>
                            <execution>
                                <goals>
                                    <goal>exec</goal>
                                </goals>
                            </execution>
                        </executions>
                        <configuration>
                            <executable>java</executable>
                            <arguments>
                                <argument>-Doracle.jdbc.fanEnabled=false</argument>
                                <argument>-classpath</argument>
                                <classpath/>
                                <argument>com.wordpress.redstack.Producer</argument>
                            </arguments>
                        </configuration>
                    </plugin>
                </plugins>
            </build>
        </profile>
    </profiles>
</project>
This defines the Maven coordinates for our project, the dependencies we need to compile and run our code, and also a convenience goal to run the consumer (or producer) directly from Maven so that we don’t have to worry about constructing the class path manually. Let’s also create some directories to store our code:
mkdir -p src/main/java/com/wordpress/redstack
mkdir -p src/main/resources
Now let’s create a Java class in src/main/java/com/wordpress/redstack/Consumer.java with the following content:
package com.wordpress.redstack;

import java.sql.SQLException;

import javax.jms.JMSException;
import javax.jms.Session;
import javax.jms.Topic;
import javax.jms.TopicConnection;
import javax.jms.TopicConnectionFactory;
import javax.jms.TopicSession;

import oracle.AQ.AQException;
import oracle.jms.AQjmsFactory;
import oracle.jms.AQjmsSession;
import oracle.jms.AQjmsTextMessage;
import oracle.jms.AQjmsTopicSubscriber;
import oracle.ucp.jdbc.PoolDataSource;
import oracle.ucp.jdbc.PoolDataSourceFactory;

public class Consumer {

    private static String username = "admin";
    private static String url = "jdbc:oracle:thin:@phxprod1_high?TNS_ADMIN=/home/mark/src/redstack/PHXPROD1";
    private static String topicName = "phx_topic";

    public static void main(String[] args) throws AQException, SQLException, JMSException {

        // create a topic session
        PoolDataSource ds = PoolDataSourceFactory.getPoolDataSource();
        ds.setConnectionFactoryClassName("oracle.jdbc.pool.OracleDataSource");
        ds.setURL(url);
        ds.setUser(username);
        ds.setPassword(System.getenv("DB_PASSWORD"));

        // create a JMS topic connection and session
        TopicConnectionFactory tcf = AQjmsFactory.getTopicConnectionFactory(ds);
        TopicConnection conn = tcf.createTopicConnection();
        conn.start();
        TopicSession session =
           (AQjmsSession) conn.createSession(true, Session.AUTO_ACKNOWLEDGE);

        // create a subscriber on the topic
        Topic topic = ((AQjmsSession) session).getTopic(username, topicName);
        AQjmsTopicSubscriber subscriber =
           (AQjmsTopicSubscriber) session.createDurableSubscriber(topic, "BOOK");

        System.out.println("Waiting for messages...");

        // wait forever for messages to arrive and print them out
        while (true) {

            // the 1_000 is a one second timeout
            AQjmsTextMessage message = (AQjmsTextMessage) subscriber.receive(1_000);
            if (message != null) {
                if (message.getText() != null) {
                    System.out.println(message.getText());
                } else {
                    System.out.println();
                }
            }
            session.commit();
        }
    }

}
Let’s take a look at the interesting parts of that code.
private static String url = "jdbc:oracle:thin:@phxprod1_high?TNS_ADMIN=/home/mark/src/redstack/PHXPROD1";
This defines the URL that we will use to connect to the database. Notice that it is using an alias (phxprod1_high) – that might look familiar, remember we saw those on the OCI Console when we were downloading the wallet. If you take a look at the tnsnames.ora file in the PHXPROD1 wallet you will see how this is defined, something like this:
phxprod1_high = (description= (retry_count=20)(retry_delay=3)(address=(protocol=tcps)(port=1522)(host=adb.us-phoenix-1.oraclecloud.com))(connect_data=(service_name=xxx_phxprod1_high.adb.oraclecloud.com))(security=(ssl_server_cert_dn="CN=adwc.uscom-east-1.oraclecloud.com, OU=Oracle BMCS US, O=Oracle Corporation, L=Redwood City, ST=California, C=US")))
In our main() method, we start by connecting to the database instance:
        // create a topic session
        PoolDataSource ds = PoolDataSourceFactory.getPoolDataSource();
        ds.setConnectionFactoryClassName("oracle.jdbc.pool.OracleDataSource");
        ds.setURL(url);
        ds.setUser(username);
        ds.setPassword(System.getenv("DB_PASSWORD"));
Notice that we are reading the password from an environment variable – so you’ll need to set that variable wherever you are going to run this (note – this is not my real password, just an example):
export DB_PASSWORD=Welcome123##Next we set up a TopicConnection, start a JMS Session, look up our Topic and create a Subscriber. This is all fairly standard JMS stuff 🙂
        // create a JMS topic connection and session
        TopicConnectionFactory tcf = AQjmsFactory.getTopicConnectionFactory(ds);
        TopicConnection conn = tcf.createTopicConnection();
        conn.start();
        TopicSession session = (AQjmsSession)
           conn.createSession(true, Session.AUTO_ACKNOWLEDGE);

        // create a subscriber on the topic
        Topic topic = ((AQjmsSession) session).getTopic(username, topicName);
        AQjmsTopicSubscriber subscriber =
           (AQjmsTopicSubscriber) session.createDurableSubscriber(topic, "BOOK");

        System.out.println("Waiting for messages...");
I created a Durable Subscriber and named it BOOK. We’ll see that name again later, remember that!
Finally, we are going to just wait for messages forever and print them out.
        // wait forever for messages to arrive and print them out
        while (true) {
            AQjmsTextMessage message = (AQjmsTextMessage) subscriber.receive(1_000);
            if (message != null) {
                if (message.getText() != null) {
                    System.out.println(message.getText());
                } else {
                    System.out.println();
                }
            }
            session.commit();
        }
Normally, we would not wait forever, and we’d clean up our resources, but since this is just a small example consumer, we’ll make some allowances 🙂
Ok, that takes care of our consumer. We won’t run it yet, since we have not created the topics. Let’s do that now!
Create the topics
We are going to create two topics, one in each database instance/region, and configure propagation between them. Let’s review what we want:
| Ashburn (producer side) | Phoenix (consumer side) |
| ASHPROD1 database instance | PHXPROD1 database instance |
| ASH_TOPIC topic | PHX_TOPIC topic |
Navigate back to your ASHPROD1 Autonomous Database in the OCI Console and click on the “Database Actions” button:

Note that your browser might think this is a pop-up and block it. If so, clicking on the button again usually lets the browser know you really meant to open it 🙂
In the Database Actions page, click on the “SQL” card to open the SQL Worksheet:

If you get the tour, you can click on “Next” or the “X” to close it.
We are just going to create our topics in the ADMIN schema. In real life, you would probably create a new user/schema to keep your topics in, perhaps several so that you can group them for easier administration. You can create topics with Java or PL/SQL. For this example, we will use PL/SQL.
Here’s the commands to create and start our new topic, ASH_TOPIC:
begin
    dbms_aqadm.create_sharded_queue(
        queue_name => 'ash_topic',
        multiple_consumers => TRUE
    );
    dbms_aqadm.start_queue('ash_topic');
end;
If you are using 21c, instead of create_sharded_queue, you should use create_transactional_event_queue – that procedure was renamed in 21c.
You can put these commands into the worksheet at the top (1), then click on the “Run Statement” button (2). You will see the result in the “Script Output” window (3) as shown below:

If you want to check, you can run this query to see details of the queues and topics in your schema:
select * from user_queues;Now, we need to go to our PHXPROD1 database and create the PHX_TOPIC there. Just repeat what you just did for ASHPROD1 on the PHXPROD1 database and remember to change the name of the topic in the commands that you run!
Create the Database Link
Great, our topics are ready to go! Next, we need to create a Database Link from the ASHPROD1 database to the PHXPROD1 database. The Database Link will allow us to perform actions against the remote database, in this case, to enqueue messages on the remote topic.
Since our databases are using TLS, we need to make the remote database (PHXPROD1) wallet available to the ASHPROD1 database, so that it can authenticate. The easiest way to do this is to upload the files we need into an Object Store bucket.
Let’s create the bucket. In the OCI Console, make sure you are in the Ashburn region and then click on the “hamburger” menu (the three lines at the top left), then “Storage” and the “Buckets”:

Then click on the “Create Bucket” button. Give your bucket a name, I used dblinks and click on the “Create” button. All the defaults are fine for what we need:

Notice that your bucket is private:

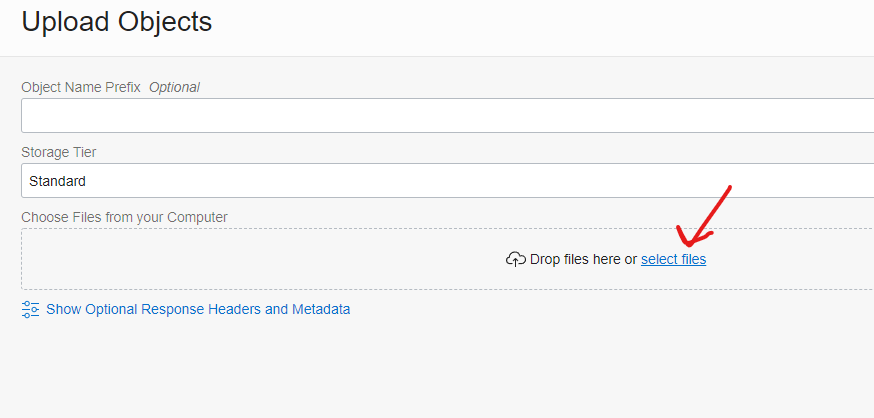
Click on the “Upload” button to upload a file:
Then click on the “select files” link to choose the file. We need the file called cwallet.sso in the wallet we downloaded for the PHXPROD1 database (the remote database):
Once the upload completes you can close that dialog and then click on the “three dots” (1) next to the file we just uploaded and choose the “Create Pre-Authenticated Request” (2) option:
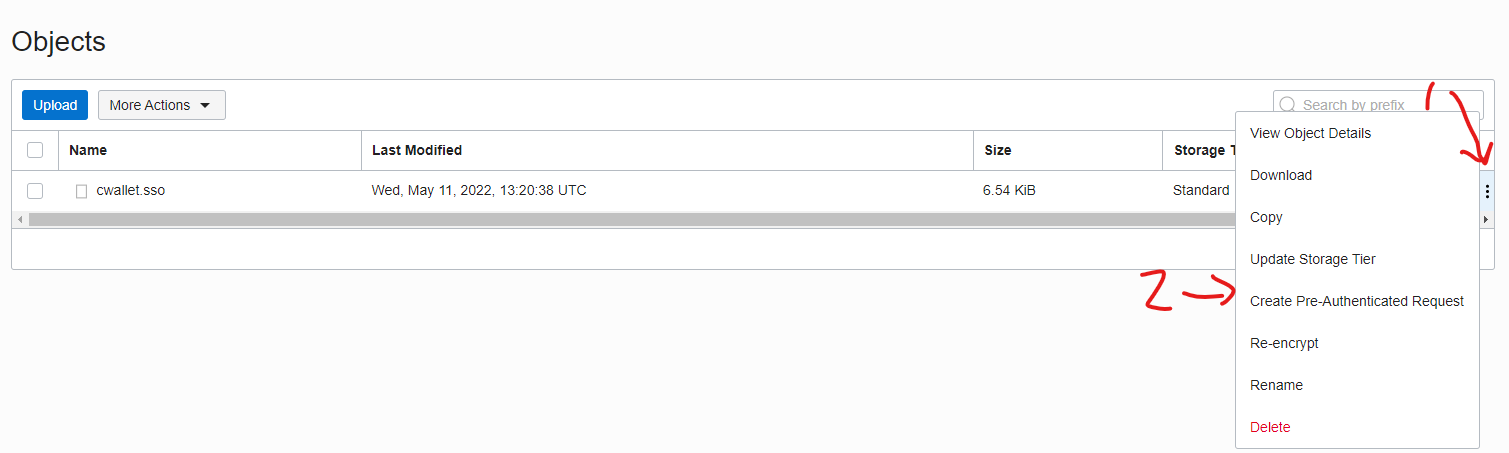
The defaults are what we want here – we want to be able to read this one object only. If you want to change the expiration to something like 2 days, just to be on the safe side, that’s not a bad idea at all! Click on the “Create Pre-Authenticated Request” button:

Make sure you take a copy of the URL, you won’t be able to get it again!

Ok, now we are ready to create the link. Open the SQL Worksheet for the ASHPROD1 database (the local/source database) and run these commands. You will need to get the right values for several fields before you run this, I’ll tell you where to get them next:
create or replace directory AQ_DBLINK_CREDENTIALS
as 'aq_dblink_credentials';

BEGIN
  DBMS_CLOUD.GET_OBJECT(
    object_uri => 'https://objectstorage.us-ashburn-1.oraclecloud.com/p/xxxx/n/xxxx/b/dblinks/o/cwallet.sso',
    directory_name => 'AQ_DBLINK_CREDENTIALS',
    file_name => 'cwallet.sso');

  DBMS_CLOUD.CREATE_CREDENTIAL(
    credential_name => 'CRED',
    username => 'ADMIN', -- remote db has case-sensitive login enabled, must be uppercase
    password => 'Welcome123##');

  DBMS_CLOUD_ADMIN.CREATE_DATABASE_LINK(
    db_link_name => 'PHXPROD1',
    hostname => 'adb.us-phoenix-1.oraclecloud.com',
    port => '1522',
    service_name => 'xxxxx.adb.oraclecloud.com',
    ssl_server_cert_dn => 'CN=adwc.uscom-east-1.oraclecloud.com, OU=Oracle BMCS US, O=Oracle Corporation, L=Redwood City, ST=California, C=US',
    credential_name => 'CRED',
    directory_name => 'AQ_DBLINK_CREDENTIALS');
END;
In the GET_OBJECT call, the object_uri needs to be that URL that you just copied from the Pre-Authenticated Request.
In the CREATE_CREDENTIAL call, the username should be the user for the remote (PHXPROD1) database – we can just use ADMIN. Note that this must be in upper case since Autonomous Database is configured for case-sensitive login by default. The password should be the password for that user.
In the CREATE_DATABASE_LINK call, the db_link_name is what we are going to use to refer to the remote database. I just used the name of the database – you’ll see later why that makes things more intuitive. You can get the values for the hostname, port, service_name and ssl_server_cert_dn fields from the wallet you downloaded. Make sure you use the wallet for the PHXPROD1 database. You will find the right values in the tnsnames.ora file, and you can just copy them in here. Here’s an example, I’ve bolded the values we need:
phxprod1_high = (description= (retry_count=20)(retry_delay=3)(address=(protocol=tcps)(port=1522)(host=adb.us-phoenix-1.oraclecloud.com))(connect_data=(service_name=xxxx_phxprod1_high.adb.oraclecloud.com))(security=(ssl_server_cert_dn="CN=adwc.uscom-east-1.oraclecloud.com, OU=Oracle BMCS US, O=Oracle Corporation, L=Redwood City, ST=California, C=US")))Once you have all the right values, paste this into the SQL Worksheet and click on the “Run Script” button:

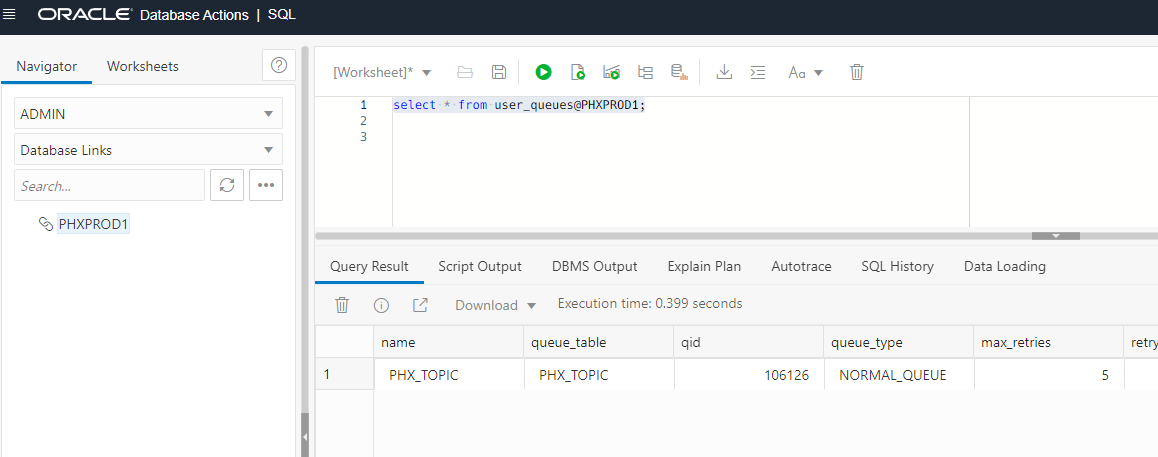
You can check it worked by doing a query through the database link. For example, let’s get a list of the queues/topics on the remote database. We are entering this query on the ASHPROD1 instance, using the database link (“@PHXPROD1“) to have it run on the other database, notice that the output shows the topic PHX_TOPIC we created in the PHXPROD1 database:
Start message propagation
Ok, now we are ready to start propagating messages! (Yay!)
We want to run these commands in the SQL Worksheet on the ASHPROD1 database (the source/local database):
BEGIN
   dbms_aqadm.schedule_propagation(
      queue_name         => 'ash_topic',
      destination        => 'phxprod1',
      destination_queue  => 'phx_topic');
   dbms_aqadm.enable_propagation_schedule(
      queue_name         => 'ash_topic',
      destination        => 'phxprod1',
      destination_queue  => 'phx_topic');
end;
You can view the schedule you just created with this query:
select destination, LAST_RUN_TIME, NEXT_RUN_TIME, LAST_ERROR_TIME, LAST_ERROR_MSG
from dba_queue_schedules;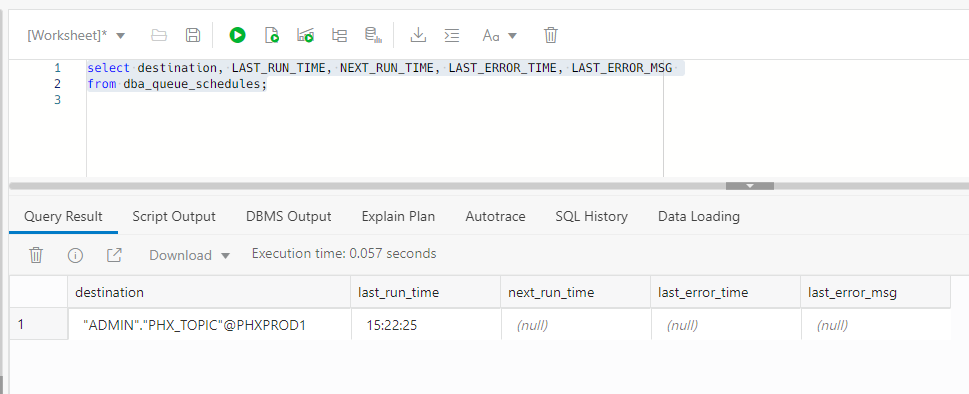
Start the consumer
Now we can start up our consumer! Back in our directory with our code (the one with the pom.xml in it) run this command to start the consumer:
export DB_PASSWORD=Welcome123##          <-- use your real password!
mvn clean compile exec:exec -P consumer
After a few moments, the consumer will start up and we will see this message indicating that it is connected and waiting for messages:
[INFO]
[INFO] --- exec-maven-plugin:3.0.0:exec (default-cli) @ propagation ---
Waiting for messages...
So now, we need to send some messages to it!
Creating a Producer
Let’s create another Java file called src/main/java/com/wordpress/redstack/Producer.java with this content:
package com.wordpress.redstack;

import java.sql.SQLException;

import javax.jms.JMSException;
import javax.jms.Session;
import javax.jms.Topic;
import javax.jms.TopicConnection;
import javax.jms.TopicConnectionFactory;
import javax.jms.TopicSession;

import oracle.AQ.AQException;
import oracle.jms.AQjmsAgent;
import oracle.jms.AQjmsFactory;
import oracle.jms.AQjmsSession;
import oracle.jms.AQjmsTextMessage;
import oracle.jms.AQjmsTopicPublisher;
import oracle.ucp.jdbc.PoolDataSource;
import oracle.ucp.jdbc.PoolDataSourceFactory;

public class Producer {

    private static String username = "admin";
    private static String url = "jdbc:oracle:thin:@ashprod1_high?TNS_ADMIN=/home/mark/src/redstack/ASHPROD1";
    private static String topicName = "ash_topic";

    public static void main(String[] args) throws AQException, SQLException, JMSException {

        // create a topic session
        PoolDataSource ds = PoolDataSourceFactory.getPoolDataSource();
        ds.setConnectionFactoryClassName("oracle.jdbc.pool.OracleDataSource");
        ds.setURL(url);
        ds.setUser(username);
        ds.setPassword(System.getenv("DB_PASSWORD"));

        TopicConnectionFactory tcf = AQjmsFactory.getTopicConnectionFactory(ds);
        TopicConnection conn = tcf.createTopicConnection();
        conn.start();
        TopicSession session = (AQjmsSession)
           conn.createSession(true, Session.AUTO_ACKNOWLEDGE);

        // publish message
        Topic topic = ((AQjmsSession) session).getTopic(username, topicName);
        AQjmsTopicPublisher publisher = (AQjmsTopicPublisher) session.createPublisher(topic);

        AQjmsTextMessage message = (AQjmsTextMessage)
           session.createTextMessage("hello from ashburn, virginia!");
        publisher.publish(message, new AQjmsAgent[] { new AQjmsAgent("bob", null) });
        session.commit();

        // clean up
        publisher.close();
        session.close();
        conn.close();
    }

}
Let’s walk through this code. It’s very similar to the consumer, so I’ll just point out the important differences.
    private static String username = "admin";
    private static String url = "jdbc:oracle:thin:@ashprod1_high?TNS_ADMIN=/home/mark/src/redstack/ASHPROD1";
    private static String topicName = "ash_topic";
Notice that we are using the ASHPROD1 instance in the producer and the ASH_TOPIC.
        // publish message
        Topic topic = ((AQjmsSession) session).getTopic(username, topicName);
        AQjmsTopicPublisher publisher = (AQjmsTopicPublisher) session.createPublisher(topic);

        AQjmsTextMessage message = (AQjmsTextMessage)
           session.createTextMessage("hello from ashburn, virginia!");
        publisher.publish(message, new AQjmsAgent[] { new AQjmsAgent("bob", null) });
        session.commit();
We create a TopicProducer, and we are sending a simple JMS Text Message to the topic.
Let’s run our producer now:
export DB_PASSWORD=Welcome123##          <-- use your real password!
mvn clean compile exec:exec -P producer
When that finishes (you’ll see a “BUILD SECCESS” message) go and have a look at your consumer, you should see something like this:
[INFO] --- exec-maven-plugin:3.0.0:exec (default-cli) @ propagation ---
Waiting for messages...
hello from ashburn, virginia!
Yay! It worked! We just published a message on the ASH_TOPIC in the ASHPROD1 instance and it was propagated to PHXPROD1 for us and our consumer read it off the PHX_TOPIC in PHXPROD1.
Here’s an interesting query we can run to see what happened:
select queue, msg_id, msg_state, enq_timestamp, deq_timestamp, deq_user_id, user_data, consumer_name from aq$ash_topic;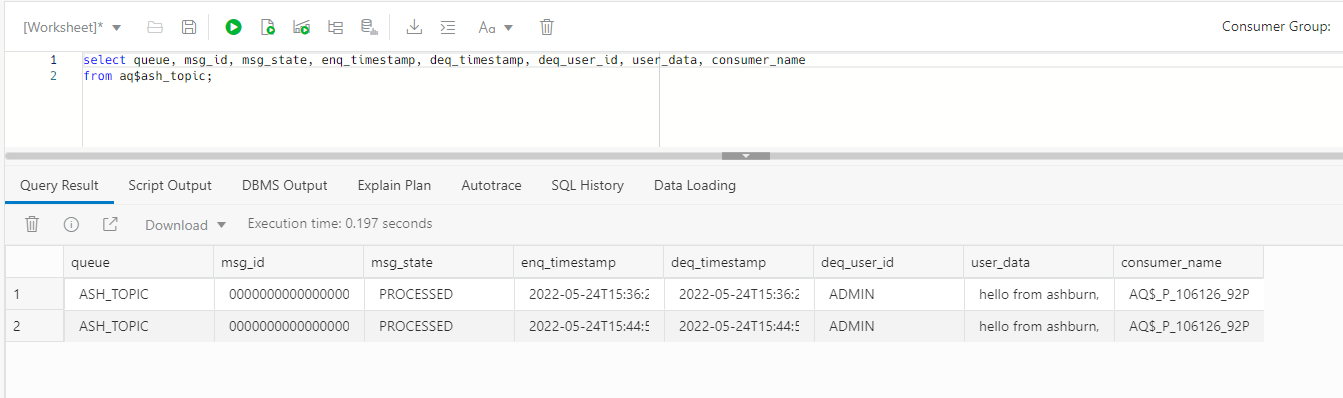
You can also run that on the remote database like this:
select queue, msg_id, msg_state, enq_timestamp, deq_timestamp, deq_user_id, user_data, consumer_name
 from aq$phx_topic@phxprod1;
Notice the consumer names – in the local ASHPROD1 instance, the consumer is AQ$_P_106126_92PHXPROD1 (yours will probably be slightly different.) That’s the propagation consumer that is running to propagate the messages to PHXPROD1.
But in the PHXPROD1 instance, the consumer is BOOK! That’s the name we gave to our consumer:
        AQjmsTopicSubscriber subscriber = (AQjmsTopicSubscriber)
           session.createDurableSubscriber(topic, "BOOK");
Go ahead and send some more messages with the producer! Enjoy!


You must be logged in to post a comment.